Wardrobe Architect, Week 7: Prints vs. Solids

Hi, my name is Becky, and I’m a printoholic.

At least, that’s how I usually think of myself. When it comes to shopping, both for fabrics and when I’m at the thrift store, the print is what generally draws my eye first. I have to make a much more conscious effort to think of wardrobe staples in solids, and get way more excited about sewing the prints. I dream of someday having the guts and print-mixing savvy of people like Oona, because then I can wear more prints at once! So this exercise was an interesting one for me.

If you take a look at my closet, yes, there’s solids. The most prominent ones at the moment are my jackets. But there’s quite a few prints hanging out there, too. Sarai’s suggested homework was to pull out my 10-20 most worn items and see what’s prints vs what’s solids, but I didn’t feel that would give an accurate assessment of my particular tastes. Especially this time of year, when I rely so heavily on pants and layering pieces, and pretty much all of my jackets/sweaters and all of the Thurlows I made recently are solids. So I did things a little differently…

I went through my closet and took a look at 3 different categories of things–tops, skirts and dresses. (I left out pants, jackets and sweaters, since as I said, they’re all pretty much solid at this point, aside from a few subtle stripes in purchased pants and one Anthropologie cardigan.) I further divided tops into things I’m more likely to wear when it’s warmer vs cooler, because I suspected that my print preferences could change with the seasons. So here’s what I found–I even made pie charts, just because I could!

This one surprised me, actually. I wasn’t expecting so many of my warmer tops to be solid. But I guess it makes a little sense, because I’m also more likely to wear print skirts in the warmer weather, and I generally wear a solid top with those. (For the record, this did not include graphic t-shirts, camisoles, or other knit basic tank tops.)

This one was a little more balanced out overall, though there were also more things that I wasn’t sure how to categorize.

I’m not really surprised that nearly half of my skirts were solid. “Other” tended to lean more towards novelty prints here.

I didn’t count more formal-type dresses in here, or that would have upped the solid count. As it was, I tend to think of dresses more as a one-and-done wardrobe option, which is why prints so solidly dominate here.

To take a closer look at what I actually own, I pulled out several typical print garments for me, depending on the season.

 The majority of things in both rows are things I’ve made, but there are a few purchased things in there as well.

I also took a look at what’s actually in my stash right now and easily accessible. (So not things that I already have bagged up for specific projects, and not things that are more of a texture-print.)

A few stripes, a few paisleys, lots of big graphic floral-type things, though I honestly have to say that the one I’m most excited about using is that Japanese teacup print in the center top row!

So, to summarize:

  • “Floral prints”, for me, tend to be more stylized or even geometric in nature. They also more often lean towards a medium-to-large scale. It’s also pretty common for them to actually be leaves.
  • A lot of my “other” fell under the categories of paisley, or a hand-dyed look, or more pictoral prints, like the day 13 skirt here. I do love a good novelty print, but in practice, am more likely to use them as bags. (Or jacket linings.) However, some of my florals could also be considered a novelty print. Lonsdale dress, I’m looking at you. 
  • I like swirly prints, apparently. A lot of them have curving lines.
  • Yes, my taste in prints are somewhat seasonal! I’m much more likely to wear stripes or plaid in the colder months, for instance. And florals when it’s warmer. How novel.
  • For the most part, things like dots and animal prints, which were two of the examples given in the post, didn’t even rank. I think I have two dotted prints total, and you see them both in this post.
  • Overall, it looks like the way I should rank my taste in prints is the following:
    • 1. stylized/bold florals
    •  2. Abstract/geometric, often with a swirly motif
    • 3. Stripes or plaid
    • 4. Novelty prints

So I made this, using prints I already have, either in my finished clothes or in my stash. Photoshop is magic.

Sew Grateful Week, days 3 & 4

I’m lumping these together again– partially because I had to really think about the resources, and partially because I was a little more focused on having a solid sewing day yesterday– my birthday gift to myself! 🙂 (It was yesterday, and yes, I got spoiled– I got lots of lovely messages on various social media from friends and family, two gift cards to Joann’s that should cover notions for my fabric stashbusting endeavors for awhile, a set of pretty interchangeable knitting needles, and Doug gave me an appointment for a massage at a local spa. My shoulders are almost always tense, probably mostly due to my choice of musical instrument, so I’m really looking forward to that!)

Day 3: Sharing Resources Day

Since I don’t have any new tutorials or groundbreaking technique tips at the moment, I thought I’d share two resources I’ve found for places to get sewing supplies that you wouldn’t necessarily think of. I’m highly reliant on internet shopping for my crafty needs, so I’ve had to get creative sometimes!

#1: Dharma Trading Company. They’re probably most commonly known as a one-stop shop for all of your dye needs. So obviously, if you want to play with dyeing some fabric, this is a great place to get your colors! But they also have a really nice selection of natural fiber fabrics by the yard, including cotton, hemp blends, bamboo, and silk. Most of it is in a natural color, obviously, since it’s meant to be dyed. What I’ve most often bought from here is the silk, because the prices are really good compared to places like Fabric.com and Mood–all of my lining and underlining fabrics for my wedding dress were purchased from here, except the nude organza to underlay the lace on the sheer part of the bodice, and this is the first place I’d look to get silk organza for tailoring-type projects and interfacings.

#2: KnitPicks. Yes, the place I already linked to for those knitting needles. You might already know about this if you’re one of those sewcialists who also knits, but I was surprised to learn recently that they sell buttons! I shouldn’t be… I mean, cardigans. But I was recently looking for a larger quantity of buttons for my current project, Joann’s didn’t have enough of anything in stock, I did some poking around on Etsy, fell in love with a certain style of button that the seller only had one of, and then the Google rabbit hole led me to here. They’re not necessarily an inexpensive source, and the majority was a brand that’s pretty common at Joann’s, but it’s probably fairly comparable to paying full price at a fabric store. More importantly, I was able to get 16 buttons that matched. (I’m super-excited about the ones I found, but am going to wait for the finished project post to show those off.)

Day 4: Sewing Project Day
I’ll have to go with an in-progress post here. As you know from recent posts, my current project is the Sewaholic Robson Coat. I’m grateful to Tasia for coming up with such a cute jacket design, and to the Sewcialists for the #bluefebruary sewalong–even though it’s highly unlikely at this point that I’ll finish this one while it’s still February, given that it ends, um, tomorrow, it was great incentive to get this started at a time where I’m likely to be done by the time it actually gets to spring jacket weather!

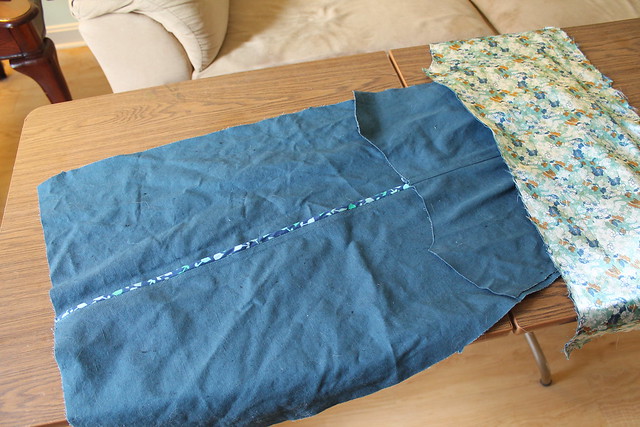
IMG_1171I did some very minor tweaks to my muslin that worked out really nicely, so I got the whole thing cut out on Tuesday and started sewing the real thing yesterday. I don’t have a lot to show for it yet, mostly because I’m trying to take my time and do a really nice job.So this picture pretty much encompasses what I did get done so far, aside from already needing to iron that sewn piece again! I underlined the sleeve pieces with a silky print from my stash, leftover from this jacket, basting it together by hand. I already had the strips cut and sewn together, but I had to buy a bias tape maker and it didn’t come in until Tuesday, so I had to press about 12 yards of bias tape. I also spent some time fiddling with the idea of a bound buttonhole, and I’m glad I tested this first, because I don’t think it will work for this particular project. (The buttons are on the small side, so I don’t have much room to maneuver.) So I really only have one seam and two pocket flaps done, and the inside pocket pieces basted onto the front pieces.

IMG_1170
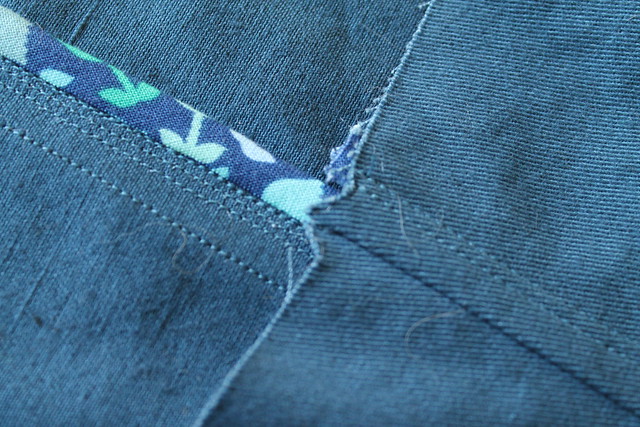
A closer-up view of that seam. I’m basically having to sew all of these seams five times– once for the actual seam, twice more to enclose the edges with that bias binding, and twice more for topstitching. I think the double topstitching will look really nice, though. The reason I’m doing the two rows close together like that is because I probably should have bought a wider bias tape maker, because I’m just barely getting the raw edge caught with the edgestitching, and the topstitching row further from the seam will help to further secure the binding.

If I can keep the topstitching this neat, and get the wrinkles pressed out a little better–I have a feeling my bottle of Best Press is going to be my best friend here–I think this will look really nice when it’s all together!

One more Sew Grateful note– there’s still plenty of time to enter the fabric giveaway

Sew Grateful Week!

Day 1- Giveaway!
Better late than never, right? I didn’t find out until right before I needed to leave for teaching and a rehearsal that Sew Grateful week was happening this week. I’ve been blogging for awhile, but never really got to fully participate in this before. And the sewing community is such a fun place that I’d love to have a chance to give something back! (I was thinking it would be fun to do a little giveaway soon anyway, since my birthday is tomorrow, so the timing couldn’t be more perfect!)

I have two pieces of fabric to offer. Unfortunately, due to the weight/size, I can only ship within the US. (Sorry!) But hopefully they’ll find good homes with one of you lovely ladies!

SWAP- suitingThe first piece is a taupeish suiting. It’s 58″ wide, and I have 3 yards of it. People sometimes give my quilter mom fabrics, and if they’re more suited to clothes, she passes them on to me–this was one of those. I don’t know the fiber content, and haven’t done a burn test to know for sure, but I strongly suspect that there’s wool in it, based on how my hands reacted to folding this up! Which means that I can’t use this, but it could be great for someone else.

IMG_1162
The second piece is a red organic cotton twill, 58″ wide, 2 yards. I bought this one online from Mood a few years ago, thinking that I needed to branch out into some warmer colors and I should make it into a Beignet skirt. I haven’t gotten to that pattern yet, and it’s just as well, because red isn’t really a color that I wear much at all. But I know a lot of you love red, so I’d love to see it get into the hands of someone who will use it! The red is a little less orange than the picture shows– if I remember correctly, it’s listed as “tomato” and they still have it.

The red has been prewashed–I don’t think I washed the suiting. You may want to wash them again, if dog hair is an issue for you. (I’ve tried to keep them clean, but Golden Retriever hair gets everywhere!) If you’re interested in one or both of these fabrics, just leave a comment saying which one(s) and what you might make it into. I’ll leave the giveaway open until Sunday night.

Day 2- Reflections Day 
I’ve talked before about why I sew and how I got started and all of that, so I’m going to focus on the online sewing community. Aside from my mom and grandmother, who are both a lot more into quilting than anything else, I don’t really have local people in my life who sew. Sewing really isn’t a big thing at all where I live, so my local resources are quite limited, and if you check the map, I’m still the only one in my little state!

I’ve been blogging longer than many of the people that I’ve come to think of as sewing friends, and started it more to have an easily accessible record of the things I make and learn about sewing than anything else. It’s really been more in the last two or so years that I’ve really started to feel like I’m part of a sewing community. I love how the internet makes it so easy to find people all over my country and internationally who enjoy the same things I do. I’ve enjoyed getting to know people from places that I’ve never visited, like Europe and Australia, in this small way, and seeing what life and culture is like in these other countries.

Since I grew up sewing the “Big 4” patterns, which was all that was available in the one Joann’s store that I have around here, it’s been really fun to watch the beginnings and growth of smaller companies like Colette and Sewaholic and Cake Patterns. It’s also great to feel like I’m supporting people who really care about sewing and work so hard to put out quality products that are great for all levels of sewists.

I love that I can use things like Twitter and Instagram to get sewing advice in real time now. I also love how seemingly random comments on there can turn into fun sewalong ideas! (Hellooooo, March of the Shieldmaidens!) I’m enjoying having the group encouragement to use what I have this year through the Stash Diet and the Stashbusting Sewalong. I love seeing all of the creativity that different bloggers have with different patterns, and how generous everyone is in sharing their ideas, encouragement, and general excitement in seeing what gets made.

Mostly, since sewing has been such a big part of my life and identity for so long, I love “knowing” people that get it.

The Gabriola Skirt!

Can I just say how hard it’s been to keep this a secret? I’ve had this skirt done since December, but waited to post it till now, because I was one of the lucky ladies selected to test Tasia’s latest Sewaholic pattern! It just came out today, so go check it out!

IMG_1154This is the Gabriola skirt. I was super-excited when I got the email calling for testers when I read that she was designing a maxi skirt, and even more excited when I got selected! I love a good maxi.

Aside from one incident where I accidentally cut one of the yoke pieces the wrong way, this came together really nicely. I love the interest that the diagonal yoke seaming adds to the hip area, and it’s so swishy!

Of course I had to do the contrast version. The hardest part for me was choosing the fabric. This uses a lot of fabric, so I didn’t have anything in the stash that came remotely close to having enough yardage. (Or so I thought–after I finished this and was cleaning out the sewing room at the end of the year, I found something like 6 yards of a lightweight teal satin! Oh well. I guess I’ll just have to make another one!)

fabricI told my mom about this opportunity, and when I showed her the design lines, she suggested that a leather-looking yoke would be really cool. I completely agreed, and I kind of had my heart set on that idea. Since I was short on time, I had to go to Joann’s, and figured I could just go for one of their silky prints along with something leathery. And it figures, this was the one time where they really didn’t have a big selection of silky prints! I guess I went right between clearing out the fall/winter stuff and getting the spring stuff in. I did manage to find a suedecloth that looked very much like leather, which is even still hand-washable! And for the rest of the skirt, the best option ended up being this print.

Guess I sort of did Jungle January after all! Just in December. I’m really not that big into animal prints, but this one was subtle enough that it worked for me. Plus the color scheme is right up my alley–browns, olive greens and orange? Totally in my palette. Most of the challenges I had in putting this skirt together came from trying to mix the two fabrics, so there’s a few wrinkles in the yoke that wouldn’t have been there otherwise. But aside from needing to take a wedge out of the back seam, this one fit me pretty much right out of the envelope.

The most challenging thing for me right now is figuring out what tops to wear with it! After all, I don’t often tuck a top into a skirt. I tried it for the initial photos I sent back to Tasia, so she could see the waistband and yoke clearly. In the interest of, um, science? here’s one of those photos…this was the best shirt option I had, and it was not working. At. All. (It probably doesn’t help that the waistband gaps away from me a little bit, which is completely the fault of the fabric. It’s not really that stiff, but it’s stiff enough compared to the print that it didn’t really mold to my waist well.) So since I’ve been playing around with the Wardrobe Architect challenge anyway, I decided to throw a few different top options on and see what silhouettes would work. The first one was the green top in the above photo, which didn’t really have a good cut for this skirt. But I did find a few other options, complete with photobombing dogs…

Gabriola Skirt

For one look, I embraced my geeky side and threw on my Firefly t-shirt. You can only see part of the yoke in this, but it’s a very fitted t-shirt, which makes it work pretty well! If I really wanted to go all the way with this look, I’d probably swap out the flats for my brown sneakers or something.

IMG_1160

A more summery option would be to embrace the flowiness and throw on a looser top. This one (my “French Vanilla” top) has waist fitting, so it worked a lot better than many other tops would have.

IMG_1161

I wanted to come up with a more wintery look, too, so I threw it on with a more fitted white top and my orange cardigan. I guess the key to the tucked in look for me is to have a layer that isn’t! I feel very teachery in this. Which I guess isn’t a bad thing for days that I’m teaching, right?

And just for fun, here’s an outtake from the photoshoot: proof that those other pictures really were as good as it got!
IMG_1159 I really enjoyed getting to be a part of the testing process for this! So go check out Tasia’s versions–and I’m sure there will be lots of lovely things popping up soon from the other testers! I definitely plan on making this again at some point! (Along with maybe a few other tops to go with…though I guess I had more than I thought!)

muslin making and palette play

Same pattern company, different type of garment… I’m making a Robson Coat next!

I’ve learned from experience that Sewaholic Patterns need more tweaking on my top half than my bottom half. (Incidentally, I really hope I still have that wedding dress muslin around somewhere, because I’d like to make a “real” Cambie sometime and don’t want to muslin the top 3 times again!) So I figured I’d better actually suck it up and make a muslin on this one. Since it looked like the finished garment measurements for the bust and waist were about the same, and my bust isn’t quite that…um…flat, I decided to experiment with cutting a size 10 for the top and sleeves, grading to an 8 at the waist, and leaving it a size 8 for the hips.

Here’s my result.

Robson fitting front

The front of the coat. I didn’t cut the muslin the full length, because fitting over the hips was not the issue I was worried about. I’m also not entirely sure I pinned the coat closed in the places marked on the pattern, or on the correct side for that matter, but you get the idea. I do think my grading worked pretty well, though there is a bit of a diagonal wrinkle going towards that first pin that makes me wonder if I need to do a slight FBA after all. I also doubt I’m going to be doing airplane impressions much in this, but I wanted to test the range of movement in the arms. They feel pretty comfortable over a long-sleeved shirt, which is probably the most I’d be wearing under this, so even though it pulls when I do that, I think I’ll be good.

Robson fitting back

And then here’s the back. I know I’ve got a bit of a swayback going here, though I don’t want to overfit this one since it’s meant to be worn over other things. I might just leave it. The one tweak I’m thinking I may want to seriously consider is adding just a little more room across the upper back–this was me raising my arms to the level I would need to, say, drive my car. It’s not like I’m about to do my impression of the Hulk, but adding just a tiny bit more room, say 1/8″ in the center back on each side, might do a lot for avoiding strain on the seam. Any thoughts from you fitting gurus out there?

It looks like the sleeve length is pretty good here, but I think I’ll have to check the hem depth and probably add a little to the final pattern–I’m probably not going to want it much shorter than what it’s showing up as here.

I think I’m going to like the style of this coat! And though I am going for the full length for the real version, because I like longer coats, this muslin makes me think that it could be a cute shorter coat as well. 

I’m throwing the most recent Wardrobe Architect assignment in this post too, because it’s more or less an extension of last week’s color assignment. All we were asked to do was organize our palettes into three categories: neutrals, near-neutrals, and statement colors.

So I took last week’s palette and did a little rearranging. No surprise, over half of my colors fall into the “statement” category. Unless teal is now a neutral, because I wear it a lot these days. It’s the perfect compromise color between blue and green. So teal is totally a neutral, right?

Even though I wasn’t sure how to make metallic swatches on Photoshop, I’m adding metallic silver, gold and copper to my near neutrals, because the majority of my jewelry incorporates some kind of metallic. I do mostly lean towards silvers, but have discovered the value of having gold, especially the more antique color, and copper to mix things up over the last few years.

Of course, the problem with statement colors being your main thing is that there’s so many different shades of the same thing. Like that purple– I categorized it as plum, but it could also be eggplant, or maybe a darker radiant orchid, since that’s the color of the year. The darker green could be emerald, or kelly, or grass, or whatever. There’s probably at least 5 shades that could fall under the umbrella of “teal”. So I’m looking at this more as a guideline than a rule.

once more with feeling

Grey Thurlows 2There really isn’t too much for me to say about Thurlow pants by this time. But I finished one more pair yesterday.

This is pretty much the same fabric as the olive pair, aside from the color. For the inside, I used the same lining fabric that I used for the navy denim pair. I do have to say that after sewing two pairs at the same time, only doing one made it feel like it went so quickly! This one only took 4 days total, and I finished half of the sewing in one day. It went a little slower when it came to finishing details like the waistband and hand-stitching the hem.

I decided to play around with my color palette when choosing what to wear for these photos. Plus, I always desperately crave color this time of year anyway. The sun is actually out today, so that helps! The blouse and sweater are both thrifted– I found them on the same trip, and I couldn’t help but notice how well they went together.  I kind of love how in your face orange the cardigan is, even though I’m never really sure what to wear with it aside from this blouse and one other top that happens to have orange in the print! I haven’t worn it in a few months, though, because black pants with this always felt a little too Halloween. But I think the grey works with it pretty nicely!

Grey ThurlowsDecided to play around with poses here, too. Mostly to hide the shoes, which are less than ideal, but I didn’t have many options since I know I’m going to have to trample my way through some snow later. Yeah, I look like I’m listening to “Twist and Shout”. Anyway.

With this fifth pair, this brings my “pantsapalooza” to an end. I’m sure it won’t be the last pair I make ever– I’m in need of some more jeans, the pair of plain black pants that I’ve had since college has chosen recently to start dying (the fabric-piercing hook fell off). And I’m a little concerned about the longevity of the charcoal denim pair, since the fabric has already started pulling at certain seams! It’s not that it doesn’t fit–I think it’s more the fabric, almost like it’s a slightly looser denim weave. I’ve reinforced with extra stitching, and did a little thread-weaving on the back seam last night to try and strengthen that particular area. I will most definitely be keeping an eye on it. But for now, I am quite happy to move on to another type of project. Even though the two things I have planned next are also more on the involved side… stay tuned!

Pattern: Sewaholic Thurlow trousers

Amount of time it took to make: 4 days

Fabric used:Grey cotton twill from Fabric.com

Amount of fabric used: about 1.25 yds twill, plus .5 yards lining- 1.75 yards total

Stashed since: 2012

Current stash total: 336.5

It actually went up about 3 yards, because I made a couple of purchases last week– 3 yards of something for my March of the Shieldmaidens project, to be revealed at a later time, and half a yard each of some cotton and some flannel for a baby shower gift that I’ll need to make before sometime this spring. For Stash Diet purposes, the costume fabric is my “use 4 buy 1”, since I used my travel exception for NYC, and the shower gift falls under gift exception, because guess how much baby-appropriate fabric I have? Pretty much none. Besides, I needed about $2 more of stuff to get free shipping. 

Wardrobe Architect, week 5- Colors!

This week’s assignment was a lot of fun! I’ve been meaning to work on a color palette ever since Gillian posted her how-to months ago, so this was the kick in the pants I needed to sit down and actually do it.

After examining my closet, my fabric stash, and thinking about what colors I’m drawn to anyway, this is what I came up with:

    Not really much of a surprise, if you’ve been reading this for any length of time! And I did say that one of my core words is “colorful”. I did mostly colors up top and neutrals at the bottom, so here’s my thoughts otherwise: 
  • I’m counting the olive green and the navy as neutrals–the former because the general consensus online seems to be that it is one, and the navy because jeans are totally a neutral!
  • There’s black, because as long as I’m doing anything related to classical music, that’s a must-have in my wardrobe. Plus it goes so well with bold colors. Grey is pretty much an extension of that. I don’t mind it when it’s a cooler grey, like stone or charcoal.
  •  Aside from those, I seem to lean towards warm neutrals–I like the way ivory looks on me more than white, at least in larger doses. If it’s part of a print, I’m fine either way. I also like warmer browns, like caramel and chocolate and tea-type colors. No beige or taupe for me, thanks–that just reads to me as the colors of boredom!
  • So aside from the ivory, black and tan, this is pretty much every single pair of Thurlow pants I’ve sewed over the last several months. (Stone grey is in progress.) Go me!
  • The colors themselves aren’t much of a surprise– lots of ocean colors, right? But I do also like plummy-type shades of purple, and I’ve realized that my closet needs some warmer colors. I’ve been told that I look pretty good in orange on multiple occasions, and while I can’t find the picture, Gillian actually made a palette for me awhile back that involved coral. I don’t have much coral in my closet, but I do have one RTW blouse in that color and I think it looks pretty good. Also, it’s more orange than pink, so I can live with that. As for the yellow, I don’t think I’d want it right next to my face, but I’ve found myself getting fabrics lately that have yellow in the print. Plus my favorite flower is sunflowers, so it is definitely a color that I’m drawn to. It’s the color of sunshine and happiness, and I’d love to have more of that in my wardrobe. Especially when the world around me is all grey, white and taupe right now. (Winter. Ugh.)
  • Haha, the blue and gold right next to each other are pretty much exactly the colors of my college. I swear I didn’t do that intentionally.

Just for fun, I took a picture of my stash shelves to see how that matches up with this color scheme.

It’s pretty close, actually– you definitely get a decent representation from blues and greens. There’s a little purple, a little orange, and the couple of prints near the bottom have some splashes of yellow. I actually have some kind of knit (probably polyester, it was free so I have no idea) that’s a solid coral, though it’s hiding somewhere on the top shelf. The neutrals stay pretty much in the ivory/tan/brown/black range, though I do have a couple of prints with a navy background. There are a couple of oddball things–that red twill on the third shelf down, for instance. But for the most part, the colors I have are mostly the colors I like. And there are a few more solids than I tend to picture when I think of my fabrics! So that gives me hope that my stashbusting efforts will still work out as I’m trying to create more cohesion in my wardrobe.

(Incidentally, that’s not all the fabric– I specifically pulled a few of these that were already paired with patterns and notions out of my closet for color representation, and there are a few more things in there. Plus coat fabric yardage that just won’t fit on the shelf. My ultimate goal is to get this to a point where I can keep all of my fabric and yarn, aside from maybe scraps, on this one set of shelves, and still give it breathing room!)

    Everybody else was doing it…

    In typical fashion, I’m one of the last ones on the bandwagon. Usually it’s either that, or I miss it altogether. But, since I’d already mentioned that I needed a mental break from pants, I made a Deer & Doe Plantain tee!

    Plantain FrontThis was super-quick to make up, even with me modifying the pattern. I used Heather’s tutorial for making a contrast yoke, because the busyness of the print made me think that it could use some more solid to tie in the neck binding and elbow patches better. I’d already printed out and taped the PDF together, but I like re-tracing PDF patterns onto thinner paper to make laying out and cutting easier. I was able to get this traced, cut out, and sewn together in the span of one afternoon! It definitely helped that I did the bulk of the construction on my serger, so I didn’t have to worry about seam finishes. But it was still nice to knock a project out so quickly.

    I’m pleasantly surprised by this pattern, to be honest. The website describes the fit as “loose but elegant”, and I don’t usually care for a looser fit in my tops. But I figured I’d give it a shot, because the pattern was free, and I figured that as a worst-case scenario, I could just wear this as a bum around the house shirt. But this doesn’t hang off me like a sack, like I half-expected it to–it’s actually a lot more flattering than I thought it would be. If the knit wasn’t as drapey as it is, I don’t think it would have worked as well, so I’ll have to keep that in mind for any future versions.
    Plantain BackA shot of the back, modeled with the charcoal version of the latest Thurlows. It makes me look really curvy!

    Aside from the modifications to make the yoke, including a little extra topstitching to make the pieces lie flatter, I made this a straight-up size 40. The only other sizing modification that I made was to add an inch to the sleeves, in what I call my “monkey arm adjustment”. It worked perfectly, and I was able to go ahead and use the 3/4″ hem allowance that the pattern called for and still cover my wrists in their entirety. I was also surprised that the elbow patches ended up actually hitting at my elbows without any adjustments.

    Plantain closeup

    One more shot on Donna, for a closeup of the fabrics!  I love this stylized floral knit–it feels somewhat Asian to me. I’ve been hoarding both of these for awhile, and had been thinking for a long time about using them together, since the teals are so close in color. My long-term thought had been to make some kind of knit dress out of it, but I’ve been putting it off for a long time because the print is on the thinner side, and I figured I’d have to try and line it somehow to keep my underwear from showing through. While working through all of the Wardrobe Architect stuff so far, though, I realized that I’d probably get a lot more use out of this as a top. I’m pretty good on summery dresses (even though I do have definite plans to make more), and this fabric is too thin to make a good colder-weather dress. So I guess this process is helping me make smart sewing decisions!

    Infinity scarfI still have enough of the solid teal left to make a short-sleeved or sleeveless top, since I really only used a tiny segment to cut all three pieces. As for the print, I had less than 3/4 yard left of the full width. So I basically cut the ragged ends off, sewed it into a tube, sewed the ends together–instant infinity scarf! Which will be great for adding interest to more solid outfits, and nice to wear. This knit is super-soft. And since all I have left is scraps that are maybe just large enough to make undies out of (I really need to learn to do that), I shall consider this piece of stash officially busted.

    Pattern: Deer & Doe Plantain tee – third pattern used this year.

    Amount of time it took to make: A couple of hours from start to finish, plus about 30 minutes for the scarf

    Fabric used: Two pieces of rayon knit (one used up, for a total of 5 pieces so far this year.)

    Amount of fabric used: 2.25 yards of the print, plus a tiny bit more of the solid

    Stashed since: Print was from Christmas 2010, not entirely sure about the solid except that it’s been there longer than that.

    Current stash total: Approx. 333.25 yards.

    Wardrobe Architect, week 4: Silhouettes

    This week’s discussion was all about figuring out proportions and silhouettes that I want to bring into my wardrobe, based on the shapes that I figured out in week 3. Sarai suggested using Polyvore to play around, so I did. I’m honestly not too much of a retail shopper anymore–the closest I usually get is the thrift store–so my goal was more to try to put together different outfit ideas based on things I already have or would be likely to bring into my closet. Of course, even though the challenge was more based on shapes, I couldn’t ignore prints or colors! So I thought I’d share what I came up with.
    What I learned overall:

    • I will completely ignore a silhouette if I don’t like the print or color. I probably need to work on embracing the solids, don’t I?
    • I’m somewhat limited in my shoes–since I know I can’t find a lot to fit my extra-wide feet, I tried to stick with ideas that would use similar shoes to what I already have.
    • No wonder I’m having trouble with winter clothes–most of the sweaters I have don’t fit the silhouettes I’m drawn to.

    And here’s my various collections! The first two were actually two sets I made on Polyvore years ago, but they fit the project nicely, so with a few tweaks, I used them.

    From “My Core Style” Pinterest board

     I think these are probably pretty self-explanatory with the silhouettes– I made this one during one of my other “figure out my style” phases to show how I’d typically dress for when I’m teaching my flute lessons.

    Same with this one–more of a casual weekend look.

    And now, on to the ones I made specifically for this project! For these, I tried to think of ways I could vary a particular outfit, either to make it appropriate for another season or just to mix it up. I did two for summer, two for winter, and two that could go either way, depending on what I wear with it. So let’s start with summer, shall we?

    Even though this one is made with a dress, I think the same principle could apply for separates–a fitted top with an A-line skirt, for instance. Some kind of lightweight layer for when the AC freezes me out, sandals, and chunky jewelry. The fall variation would swap out the cardigan for a jacket. And my brown boots aren’t exactly like that, but close enough. (Also, this outfit is reminding me that I need to replace my falling-apart tan sandals this year. Ugh. I hate shoe shopping.)


    For my second summer look, I decided to go maxi! The flats would most likely be sandals in the summer. But I thought this would be a potentially good look for how to wear my t-shirts, too. (Incidentally, it’s hard to find the type of graphic tees that I actually wear on Polyvore, but I did find one, thanks to Etsy. It says, “I never received my acceptance letter to Hogwarts. So I have left the Shire to become a Jedi.”)  Of course, for this to actually work, I probably need a maxi-skirt or two that’s actually solid…

    I noticed belatedly that I didn’t have any shorts outfits on here. But the truth is, even though I have to own them for at least my retail job, I’m actually a lot more comfortable wearing skirts and dresses in the summer. Probably because they’re generally longer. I probably should come up with some kind of shorts silhouette I can live with, though, because skirts aren’t always a practical option in my world.

    For my first winter look, I decided to go with more of what I’d want to wear to work–in this case, skinny pants with boots, a longer top, and a sweater. This is how I’ve been wearing that short sweater that I dyed back in the fall, and I surprisingly like the look. So I’ll have to attempt making skinny pants at some point so I can play with this sort of thing more.

    My second cold-weather look is much more fall-ish, due to the color scheme of what I found. In the real world, I think I’d be more likely to wear the straight skirt with a looser sweater and the A-line skirt with a more fitted sweater. Also, I wouldn’t wear that particular print. It was just what happened to go. Also also, I need more tights. Or maybe leggings to wear as tights.

     Finally, my two looks that I tried to make multi-seasonal:
    This is the closest to what I actually have. Those grey pants could quite easily be Thurlows–and are very close to the one pair I have left to show up. I actually own those particular black flats, even though I had to import them into Polyvore to make it work. The top could be a woven or a knit, and I do like peplums. I also have yarn to knit into a cardigan very similar to that one, if I ever finish the Roheline. But with the right layering pieces, this could be very versatile.

    I tried to come up with a versatile maxi-dress look, too, since that is something I do like to wear and it would be nice to find some ways to wear them that will transcend summer.

    So how did I do? I’m not saying I’d only wear these particular silhouettes, obviously, but it’s a starting point. I’m looking forward to seeing what tomorrow’s challenge is!

    Thurlows so nice, I made them twice

    Twice more would probably be more accurate. But I finally got to test out my plan to sew these assembly-line style. I still have one more pair cut out to sew, but the serger thread has to be different for it to look best, so I waited. Navy blue and charcoal, though? Black served absolutely fine for both.

    Navy Denim ThurlowsSince I’ve already showed two pairs of these, there isn’t too terribly much to say. (Other than I need to work on my tripod camera positioning, because this angle makes me look kind of stumpy!) I did make a few minor detail changes to make them more jeans-style, since both of these are made from a lightweight denim. There’s topstitching on the waistband, the darts, and around the welt pockets. I added a bar tack on the fly and some topstitching to just after the front pockets after wearing the charcoal pair for a day, because a stress point was already showing! (I also reinforced the stitching in the crotch and thigh areas for the same reason.) I did not, however, make the belt loops for these two pairs– I didn’t even cut them out this time, since by the time I got to that step for the other two pairs, I was pretty much mentally done and just wanted to hem them and be finished.

    I am happy that this navy denim pair can count for the #bluefebruary sewalong!

    Charcoal Denim ThurlowsAnd here’s the charcoal pair. Do I look a little smug here? (That wasn’t intentional. I also need to work on my posing. Sadly, this was the best of the lot.) Even though you’re probably tired of me talking about making pants, I think these will both be great additions to my wardrobe that will go with tons of stuff. I had to give myself a break from pants yesterday and made a quick knit project instead (to be blogged soon), but I think I’m ready to continue with the last pair now. And then take a bit of a break from pants…but it won’t be forever, because I need some jeans! (Especially since my one pair of skinny jeans accidentally ended up in the dryer this weekend and now I can’t get them on anymore. So sad. On the plus side, now I know what to do with the leftover stretchy denim from the TARDIS skirt…)tablet case- outside

    One bonus project– I actually finished this in January, but couldn’t show it until now, since it was part of Doug’s birthday present. He’s been talking about wanting a Microsoft Surface tablet for months, so I teamed up with both sets of our parents to get him one. It came with a thin keyboard-style case, but I thought an extra case would also be helpful to keep things from jamming between the keyboard and the screen. So I used a scrap of the charcoal denim to make this envelope-style case, basically just winging it on the measurements by folding the fabric around the actual tablet.

    tablet case- inside

    The inside fabric was a fortuitous find– I went to Goodwill with my bestie recently to try to find some preliminary costume materials for some stuff we’re hoping to do later this year. While poking around the home decor section, I found this bedsheet that’s all the various hockey teams in the NHL. Doug is a huge hockey fan, so I snatched that up and smuggled it home! I only needed a small scrap for this bag, but made sure to center one of his two favorite teams so that it was showing–the one that would require me to cut into the least amount of fabric, of course! I still have quite a bit of this left, though I’m not counting it as adding to the stash, but I’m sure I can use it up for some big blocky project like making pillows for the basement, aka his “man cave”.

    And now for totals:

    Pattern: Sewaholic Thurlows (plus improvised pattern for tablet pouch)

    Amount of time it took to make: About two weeks, plus some breaks to make the pouch while Doug wasn’t home, so that averages to a little less than a week per pair. Not too shabby.

    Fabric used: lightweight denims from Fabric.com

    Amount of fabric used: approx. 3.5 yards (about 1.25 yds of main fabric/.5 yd lining per pair) – there’s approximately 1.75 yards of each main fabric remaining, though not the full width of the fabric. (Any ideas?)

    Stashed since: 2012

    Current stash total: Counting the 6 yards I just bought at Mood, about 336 yards. Well, it’s still some progress.