April month-in-review

This really does look like a super-productive month, since I tend to count stash on the months I finish the project vs. when I cut it! So let’s just jump right to the fun stuff, shall we?

Projects Finished This Month: 
8 total. Unless I count the diapers individually. Then it’s closer to 80. But that’s cheating, isn’t it? First up, the unblogged things.
https://igcdn-photos-g-a.akamaihd.net/hphotos-ak-xap1/t51.2885-15/10513794_843631739037678_835703916_n.jpg
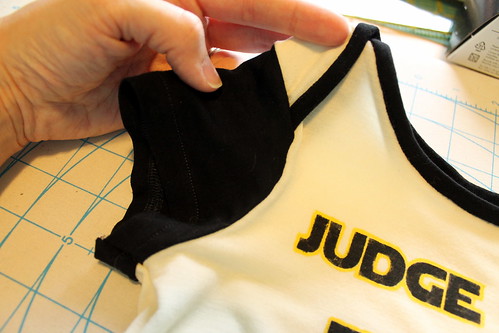
As seen on Instagram: I did take another cute-but-stained PJ set that I was given for free, plus a boring snap-front newborn tee, and did this. The applique was hand-stitched on, just like the frog one I did last month, and as a bonus, this reads completely gender-neutral to me. Which means it’s definitely something I can recycle for any future siblings. I also had a decent-sized piece of unstained fabric, so I used this tutorial/pattern to whip out a quick hat. I did have to cut one piece with a seam in the back,  but it still worked up really fast. (The snail was the other part of the original applique. It was there, so why not use it?)

Next up: Several weeks back, I was looking for maternity/baby clothes at the thrift store, and stumbled across a bin of K’Nex for a really great price. Since then, Doug and I have gotten in the habit of checking every few weekends for any more good toy finds. One week, I found a bag of wooden blocks, which just seems like one of those staple toys that every kid should have. But they needed containment. So I took a piece of stash cotton and made a bag for them. I think this was one of my mom’s dyeing-for-quilts experiments that she wasn’t totally happy with, and I just wanted to use a piece that I didn’t really care what I used it for. Honestly, I made this more complicated than I needed to–I realized about halfway through inserting the drawstring that oh, wait, I have to think about choking hazards now! So then I had to completely wing it with a zipper in my stash that wasn’t quite the right color, but oh well. I know this bag is kind of huge for the amount of blocks that we have, but I figured that it would make it easy to add any more that we might acquire. (I mean, I don’t even have the whole alphabet here!)

nursing cover
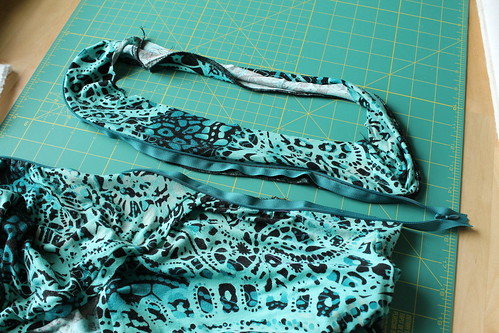
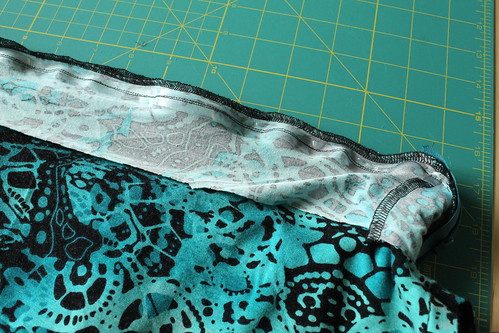
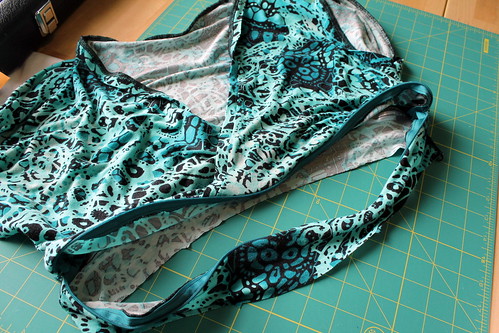
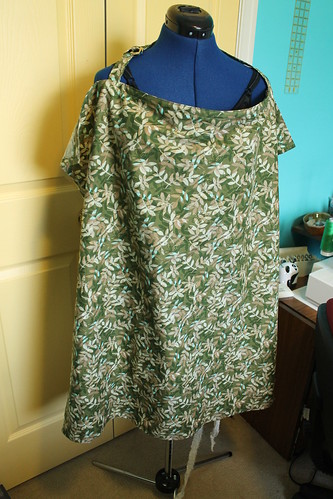
My most recent sewing project was a nursing cover. Not to say that women shouldn’t have the right to breastfeed when and where they need to or anything–I just know that I’ll personally be more comfortable if I’m able to stay covered up when I have to feed him outside of the house. Besides, I’ve had this particular quilt cotton for years, and I’m happy that I finally found a way to use some of it. I actually had this in the stash and wanted to use it for the leaf quilt I made several years ago, but it was just a little too busy of a print to really work. I still have about half of the piece left, so I’ll just need to figure out what to do with it. But this was a really fast/easy project to make– just a rectangle with a casing for a piece of boning, another two rectangles for the strap, a couple d-rings, hemming, and done. Ideally, I would have used d-rings that were a little thinner/lighter, but this is what I had in the stash, so I went with it. If it really bugs me in the long run, I can always perform a little seam ripper magic later and replace them.

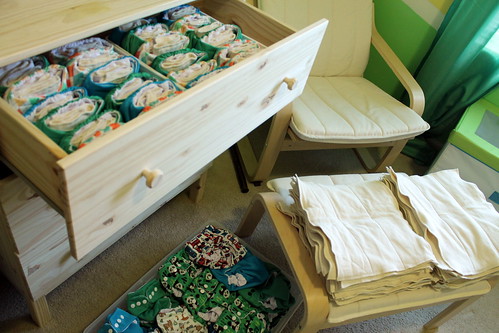
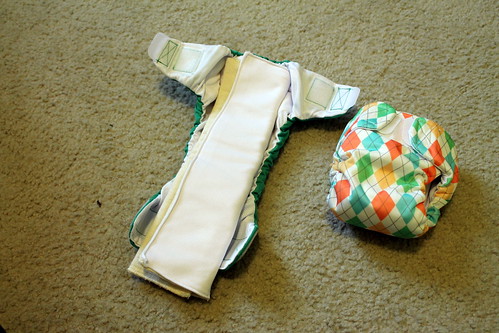
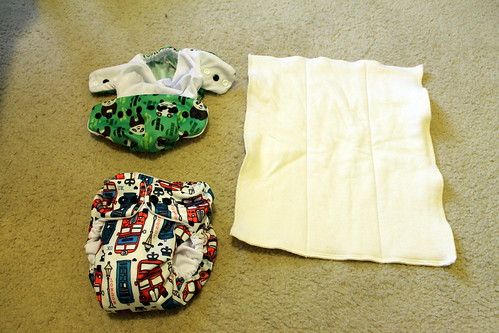
I also finished off a stack of cloth wipes to use with the diapers. But I can’t really count that as stashbusting, since my mom cut up a bunch of flannel that she had and all I had to do was serge the edges. Honestly, this isn’t even exciting enough to take a picture of, but at least it’s done.

Stashbusting totals for the month:

Stash out, not counting the 3 reconstructed projects:

  • For the diapers: 31.25 yards total of PUL, athletic mesh, and cotton fleece (!)
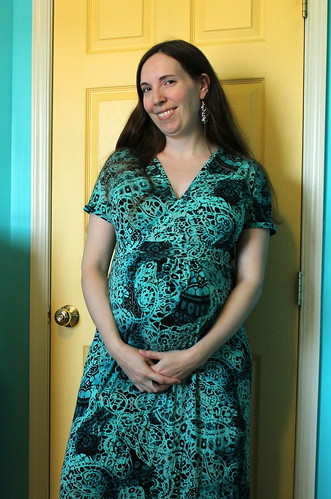
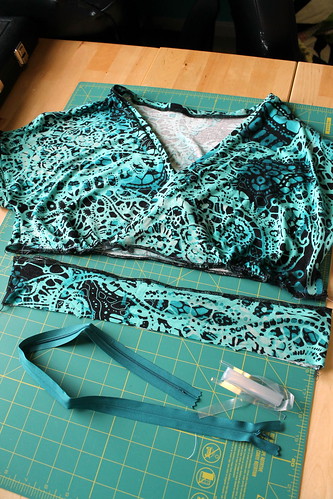
  • Maternity/nursing maxi-dress: 3 yards of knit
  • Storage bag for blocks: .5 yard of hand-dyed cotton
  • Nursing cover: 1 yard of quilt cotton

Total:  35.75 yards out, plus a few scraps for the Star Wars shirt. Woohoo!
Stash in:

  • 2 yards of an Aztec-print knit. I was out running errands with Doug one day, we stumbled across a sewing machine store, and he suggested we head in and see if we could find me some new fabric. Who am I to say no? The selection was pretty small, but since I’ve been burning through all of my print knits in making maternity clothes, I figured I could allow myself this little splurge.
  • My parents moved into a new house this month, and my mom handed off a couple of pieces of fabric that she thought might be more useful for me in making future boy clothes than her for quilting. So I got a little over 1 yard of a reversible blue fleece (brighter blue on one side, more royal on the other), and 8 yards of a plain black twill (but only 19.5″ wide!) that she had left over from a couple of non-quilt projects.  The twill will probably have to get used up for pants and shorts, but at least kid clothes are small and skinny. At least at first.

Total: 11.25(ish) yards in, but that’s still a total of 24.5 yards less than I started the month with.  For the year so far, my spreadsheet is saying that I have just over 336 yards, but I’ve used about 63 1/2 up. Which is really good for the first third of the year, especially since 3 yards is the most I can usually burn on one project!
May Goals:
I did touch on this in last month’s review.  At this point, I’ve reviewed the list, and pared it down based on what I didn’t get done this month and think is most important. So here’s what I’m hoping to do:

  • I’d still like to make that changing mat. I think that will be the next project.
  • I found instructions for how to make a baby gym on Pinterest. This wasn’t something I was originally planning on for baby gear, because those things are ridiculously expensive and bulky. But since this one snaps apart and would be really easy to set up/store, I have a large piece of a certain quilt cotton that would be perfect for this, and I have a ready supply of adorable felt things that would be perfect to hang from it (extras from some shower favors that my mom made–all animals to go along with various books), I’d like to give this one a shot.
  • I have curtains for the nursery, but I need to sew the blackout layer into the colored layer, because they’re way too sheer to keep light out for when he’s napping. The curtains need to be shortened anyway. So this should be a quick project, it’s just a case of doing it.
  • And I still need to do a lot more cooking. Though I’ve actually made a pretty good dent on recipes I’d planned for dinners–I think I have 3 more recipes to make for that, and then what I’d planned for lunches. And breakfast, if there’s still room in the freezer.

Finally, a quick little update on how those sewing lessons are going! The girl is doing very well. We took a little bit of a break around Easter due to her family going on vacation, but since then, she’s finished up the Delphine skirt from Love at First Stitch. We spent most of that day’s lesson working on invisible zipper insertion, and she did a very nice job for her first try! (Not perfect, and I did have to do a little unpicking for her at the bottom to fix where something got caught, but the end result doesn’t have that annoying bubble that invisible zippers sometimes get at the bottom.) She finished the skirt on her own after her last lesson, and I’m not sure what she wants to work on next–I’m letting her pick the projects after the bag we made first, because of course it’s more fun if you sew things you want to make. Guess I’ll find out on Monday, so here’s hoping I’m sufficiently prepared!

Sewing for boys: My Little Jedi

I have a feeling this is going to be a sporadic, ongoing series, at least while Hobbit is in the age range that I can sew things for him without him protesting. Because one of the first things I’ve learned about being a (future) boy mom who sews is that it’s a lot harder than it should be to find cute patterns/good fabric with boys in mind. I’m more hopeful about the patterns than I was initially, since recently finding an Ottobre magazine at the local Barnes & Noble/joining a Facebook group specifically focused on sewing for boys. But the fabric is still tough. Especially if I’m looking for anything that isn’t quilt cotton or doesn’t cost over $10 for just half a yard. (Which is all the fun prints I’ve found so far.)

Yoda shirtAll that to say, I made a baby shirt. And it’s geeky. Because that’s how I roll. (Though, for the record, I think this totally counts as gender-neutral. After all, girls like Star Wars, too!)

My fabric stash is going to be challenging to shop for boy clothes, because frankly, I don’t have a lot of stuff that suits–if the color is right, the fabric is usually wrong (too delicate/drapey/etc) and so on. So I was quite pleased that I was able to construct this shirt completely from my scraps! The black is leftover bamboo-blend rayon pieces from the maxi-dress I recently made, and the cream is some leftover scraps from a knit top I made years ago. I guess I’d been thinking they were large enough scraps that I could use them to attempt to make undies or something, and that’s why I still had them? But both pieces are very soft, which are perfect for baby wear. And since I used the same multi-piece pattern that I used for those hockey pants, this shirt was essentially free! I’m happy that I finished it within the SHB Sewalong timeframe, too.

Stencil closeupAs for the stencil, I remembered that I have a scrapbook cutting tool that will use any True Type font that I have on my computer to cut shapes. (Why didn’t I remember this when I was making those bibs last fall? Oh well…cutting those stencils was one of the only crafty things I was feeling up to at the time, anyway.) So I used that and some freezer paper to cut this Yoda quote out of a Star Wars-looking font. It worked pretty brilliantly, other than my evil, possessed ex-iron deciding to spew water all over the stencil when I ironed it on. The result was a little bleeding here and there where the fabric was still damp when I started working. It ended up being for the best, though– I used some other paint in my stash to outline the letters in yellow to help cover the messy bits up, and ended up liking it so much better with the pop of color than I did when it was plain black! I can still sort of see the parts where it had bled, especially around that comma, but it looks a lot better than it did.

Neckline detailThe one major change that I made to this pattern was the shoulder edging. The original instructions called for turning those little curved edges under and hemming them. That seemed rather fiddly to me, and like I’d just be setting myself up for rippling and frustration–especially given the state of my iron. So I cut an extra 1/4″ off each edge instead, cut some bias strips out of the black knit, and treated it more like a binding. So much easier, even with trying to stitch in the ditch around tiny curves to get the underside to stay in place, and I like the contrast better than I think I would have liked the plain cream.

I made this in the medium size, which looks like it corresponds roughly to somewhere in the 6-12 month range. Baby clothes sizing still baffles me, to be honest. I’ve actually resorted to hanging the onesies that I currently have in the closet by length, because they’re all supposed to be the same size, but they don’t look it at all! So I figured that if I go by length, I might be able to make faster guesses at what might fit him vs. not. Anyway, the point of all that is that I’m hoping this means he’ll still fit into this shirt next May 4th. Yes, I already made him a shirt for his first Star Wars Day. I already have his first Halloween costume plotted out, too. What’s your point?

On a side note, I’ve also learned that it’s almost impossible to find boy clothes with a sports theme that actually reference hockey. At least in the US–it’s all baseball and football and occasionally basketball. Since Doug only cares about hockey and especially dislikes baseball, we’ve actually been passing the sportsy hand-me-down clothes we’ve been given to a good friend of mine who’s due to have a boy about 6 weeks after me–clothes are all she’s needed, since she already has a young daughter, and her husband is a lot more into sports in general. Also, now that Doug knows I have a machine that will let us make custom stencils, he requested that I help him decorate one of the plainer onesies that we’ve had passed on to us. The result?

https://igcdn-photos-e-a.akamaihd.net/hphotos-ak-xfa1/t51.2885-15/11085068_1558879861044348_2079045648_n.jpgAccording to him, this font is one that gets used on some professional hockey gear. I did the machine set-up/ironing, he stenciled the black, and then I outlined it with the gold again so it would be closer to Pittsburgh Penguins colors. He had a lot of fun showing this one off to various local friends–we live in Flyers country, of course, and he likes trash-talking them–and I have a feeling he’ll want me to make more hockey-themed clothes in the future!

(Completely unrelated side note: Blogger is telling me this is my 900th post on here–crazy!)

dressed to the max(i)

Maternity/nursing maxi-dressThat’s right, I finished another maxi-dress! No camouflage baby bump for this one. It kind of looks like I just have no waist at all. (I guess I don’t right now, really.) Honestly, I don’t really feel like there’s a whole lot to say about construction, since this is the third time I’ve used the Tiramisu bodice and the exact same skirt modification that I made on my last dress. And I already detailed the nursing-friendly alteration in my last post. Really, the biggest issue I had with putting this one together was my iron–it had been acting up for awhile, and I finally hit the last straw with it while trying to press the skirt seams the other day. After all, an iron that keeps turning off while you’re actually pressing with it at the moment, and then taking forever to turn back on (and usually some unplugging and replugging–really annoying when the power strip is on the floor and you’re 7 months pregnant!) So I ordered a new iron. Hopefully this one will hold up better, since the one I’d been using lasted me less than 2 years. It’s supposed to arrive today, and none too soon, because it really shouldn’t take me half an hour to press a hem because I have to keep waiting for the iron to turn on!

side viewIsn’t this print fun? It’s one of the pieces I treated myself to when I visited Mood in NYC a little over a year ago. I’d gotten 3 yards with a maxi-dress vaguely in mind, though I certainly wasn’t expecting that it would have to be a baby bump-friendly one at the time! But I do expect that I’ll be wearing this one a lot over the coming summer. Even though the two patterns didn’t quite come together as smoothly as I’d hoped. The back seems pretty loose to me in comparison with the black dress, and it is so tempting to try to take it in around the empire waist a little. Or fake in a back seam with the serger. Or something. I have to keep reminding myself that I still have the rest of this pregnancy/the belly only getting bigger to go, I have no idea what’s going to be up with my bust size after that, and it would be better not to over-fit. I can always try to take it in a little later if needed, though it might be nice to have a looser dress when the Mid-Atlantic summer humidity kicks in. (I did tweak the sleeve/underarm area, though.)

front viewThis will probably be the last garment that I make for myself until after Hobbit arrives, to be honest. I’ve got less than 8 weeks to go before my due date now (yiiiikes), so despite the fact that I have nearly no pants that both fit and are weather-appropriate, it seems a little pointless to take the time to sew any more maternity-type clothes. I am starting to think ahead to just straight-up nursing-friendly, or things that will work with another period of my figure changing around on me, and I do have some patterns in mind for when I’m feeling up to trying to sneak in sewing time post-baby. Is it weird that after so much time sewing knit garments over the last several months, I’m really starting to get the itch to dig into my wovens stash? But since that has to wait until I have a better idea of what size to sew, any projects that show up here over the next several weeks will probably just be a big babypalooza. I know that’s not the most interesting thing for a lot of people, but honestly, this blog is pretty much just my personal craft journal anyway, and this is the stuff I need to be making right now. So, sorry not sorry, I guess?

On a slightly related note, I’ve decided that I’m going to be sitting out of Me-Made-May this year, though I will happily follow along with what others are doing! Honestly, pretty much everything I’ve made that fits right now and works for the season has already been shown on here in the last couple of months, I really only have enough of that to do about one outfit a week, and there’s other things I need to prioritize over stressing about outfits and taking pictures. Like continuing to stuff the freezer with as much pre-prepped food as possible, the mental list of baby sewing projects that I’d still like to finish in advance, and getting some music together for a couple of my flute students to work on while I’m out of commission for teaching. Not to mention that by the end of May, I’ll be in the range of “could potentially pop any time”. Hopefully I won’t go that early, especially since a couple of my students are participating in a recital two weeks before my due date, and I’d like to be there to support them. Plus, the only date that worked for everyone involved in planning my baby shower is the last Saturday of the month, and I’d really like to not miss that due to being in labor!

I also have to admit that I’m going to be a little sorry when the Small Human Being Sewalong wraps up at the end of this month. It’s been fun getting to know a couple of new-to-me bloggers, and helpful to follow along with the discussions of what ends up being useful vs. not/how to find sewing time after baby, and so on. But I’m super-close to finishing another project for that, and may be able to knock out at least one more. In the meantime, I’ll just enjoy this dress and all the pretty, swirly blues.

Tutorial: Nursing dress adaptation with an invisible zipper

I was so pleased with how my last maternity/nursing maxi-dress turned out that I decided to make a second one. This time, I made a tutorial for how I did the zipper part, in case it helps any sewists who may be expecting in the future!

SuppliesYou’ll need:

  • A knit dress pattern with a seam under the bust. I’m also intending to wear this during the remainder of my third trimester, so I’m using the top of the Cake Tiramisu dress with the midriff band and skirt of the out-of-print Simplicity 3678, since I already adapted that skirt pattern both for extra belly room and a maxi length. But if you’re making this just to wear for nursing and have an idea of what size to do the waistband, the Tiramisu or Red Velvet dress would be a great option as is.
  • An invisible zipper that’s long enough to fit across your ribs from one side seam to the other. (A few extra inches probably won’t hurt. Mine was a 22″ length, and I ended up chopping off somewhere around 2″ at the end.)
  • Clear elastic
  • I used both an invisible zipper foot and a regular zipper foot to do this portion of the construction. 

Before beginning the zipper (these three steps were completed before I started taking pictures, and you can see the results in the first picture):

1. Sew the bodice pieces, including side seams. Depending on the pattern you choose, you may need to alter the order of construction. (Normally, the sleeve and side seams of the Tiramisu are sewn all at once after the front and back of the dress are constructed flat, but I went ahead and finished the sleeves/sewed the side seams together before taking this picture, since constructing the side seams around the zipper would be much more difficult than the other way around. It may take a little more effort to get the side seams to match up between pieces this way. For my current fitting needs, the big advantage to this was that I was able to put on the mostly-finished bodice and adjust the gathering and the overlap of the neckline to the larger bust size that I’m currently working with.Which meant that I was able to use my already-sized pattern from before I was pregnant as-is.)

2. Sew the midriff/waistband pieces together at the sides, or skirt pieces if your pattern does not have an extra band. Depending on the length of your dress, you might be able to do the waist and skirt pieces together. I’m only working with the midriff band for mine, since I’m doing a long skirt and don’t want the weight of it to distort things as I sew. (Plus it’s a lot easier to take pictures that way!)

3. Finish the lower edge of the bodice and the top edge of the waistband/skirt. I know knits don’t unravel, but it does add some stability to the edge. And since we’re working with stretchy fabric and a non-stretchy zipper, that is never a bad thing.

To add the zipper:

Front bodice w/ zipper1. Sew one long side of the zipper across the bottom of the bodice, as you normally would for the right side of a vertically-inserted invisible zipper. I started the teeth at the side seam on the left side, because I’m right-handed, but you could easily flip this around if you’re left-handed. I also brought some of the extra length past the right side seam and into the back, just to give myself a little more give for opening. I probably could have done this for the left seam as well to make the whole thing more centered, but I really don’t want to have to be reaching behind me with one hand while trying to wrangle a squirming baby with the other! Better to leave the zipper pull where I can more easily see it.

Front waistband w/ zipper2. Baste the other side of the zipper onto the waistband, being careful to align the top edge of the teeth with the correct side seam. Close the zipper, check to make sure both seams are lining up on either side of the zipper, and adjust if necessary. Once you’re satisfied with how the sides are lining up, stitch over the basting line. When opened, the two pieces will look kind of like this.

Back bodice/waistband3. Sew the back of the bodice and the back of the waistband together. I added clear elastic here, both to help support the weight of the maxi-skirt and to allow it to bounce back if I need to stretch the dress to get it on over my chest later. (I had to do two rows of stitching here–to get the seam closed as much as possible, I used my zipper foot on a longer stitch length. But my machine doesn’t have a stretch stitch, and I can’t zig-zag with my zipper foot, so I added a second row of a narrow zig-zag close by, just in case some of the straight stitches pop. I know it looks a little ripply when it’s flat on the table, but the other dress is like that too, and it’s not really noticeable when wearing.)

4. Shorten zipper if necessary, and press back seams up towards bodice.

5. Continue on with the dress from here– I still need to add the skirt pieces and hem it, but that’s it!

Zipper when closedWhen the zipper is closed, it looks like a normal seam, except for that pull tab…

Zipper when opened

…and then once you open it, easy breastfeeding access without having to stretch out your neckline!

Hopefully that was clear enough–let me know if I need to clarify anything! And for those of you who are moms that sew, I’d love to hear if you have any other nursing hacks you like to add into your clothes.

They’re finally done!!

My biggest baby-sewing project, that is: the diapers. I really doubt this is the sort of thing most people reading this would be sewing, so feel free to skip this post if you think it’ll bore you. But given that this was a 2-person, 4-month job, the end is definitely worth celebrating!

Also, I’d like to give a shoutout to my mom–I know she reads this blog when she can, and I literally could not have done this and finished with this much time to spare without all of her help. My sanity would not be very intact either, for that matter. So thanks, Mom!!!

All the diapers!!So…this is what 72 cloth diapers plus inserts look like, at least as far as I could fit them into the picture. There’s 24 apiece of three different sizes: newborn, small and medium, because according to the pattern, these three sizes should fit him all the way from 8.5 to 35 pounds. Worst case scenario, if Hobbit is a fast grower, I may have to make a batch of larges sometime, but now that I know the process, hopefully one set would go fast. I also went for prints/colors that I considered to be fun-but-gender-neutral, since we started this process before I knew he’s a boy, and ideally, these will hold up well enough that I can use them again for any sibling he might get down the road. But even if they don’t, I think the money savings on using them with one child will make this effort worthwhile!

The pattern we used is called Darling Diapers Unlimited. The nice thing about this pattern is that you can use it to make pretty much any type of fitted cloth diaper that you want. The not-so-nice thing about this pattern is that it makes the directions ridiculously confusing to follow. I ended up making two different styles, and literally went through the directions to re-write out a step-by-step guide for Mom and I to follow, only using the printed directions as a reference point after that.

For all of the diapers, I used poly-urethane laminate for the outside, a softer athletic mesh for the inside layer, and cotton fleece for the “soaker” layers. I was able to get the mesh from Joann’s, but I got everything else from Diaper Sewing Supplies. The quality of their snaps and elastic sounded a lot better than the Babyville Boutique stuff I could get at Joann’s, and I liked that the company aims to supply quality American-made products in an eco-friendly manner (including their PUL manufacturing). Also, frankly, they have a much bigger variety of prints and they’re way more fun!

A little more detail on the two styles…

Newborn
Left side: Unfolded. Right side: Folded and velcroed closed.

The newborns are basically what you’d consider an “all-in-one” diaper. I did have to wing it a bit on the padding, because I’d already cut everything as rectangles to fold into thirds before I realized that the stuff-the-pocket type wasn’t even listed as an option for this size, due to how tiny they are. So I added a layer of the athletic mesh on one third of the soaker for softness, and then sewed them into the back. Since they’re still mostly detached, I’m hoping this will help them dry faster. I also ended up stitching a little extra fleece underneath in the backside region–hopefully it’s not too TMI to say that the soaker ended up being narrow enough that I was nervous about things being contained back there without a little extra width. Ahem. I used velcro for the closure, to make it easier to handle the diaper changes while we’re first learning to do this, and did the scooped front option so that it wouldn’t rub against his belly button while that’s still healing over.

Small/medium
Clockwise from top left: Unstuffed, the liner, and stuffed.

For the small and medium sizes, I did more of a “pocket diaper” for ease of cleaning and especially speed of drying. So all of the soaker layers are the tri-fold rectangles, and can be pulled out for washing. I also decided to do snaps instead of velcro for these two sizes–I figured those would stay on a little better once he starts getting mobile, and also be less likely to pick up all of the dog hair that seems to accumulate around here. That, and since these heavy-duty plastic snaps don’t separate quite as easily as the usual metal sewing ones I’ve used in the past, hopefully that will keep him from succeeding in taking them off himself! Here’s hoping that I can keep the two sizes straight, since the solid blue/green and the TARDIS print were used for both of them, and I figured I was spending enough and therefore didn’t get size labels.

The stashbusting total: a whopping 31.25 yards! Granted, I did buy all of these fabrics specifically for this project. I did have to buy an extra yard of the athletic mesh, though that got used up. I bought a little extra plain PUL from Joann’s to help reinforce snaps once I ran out of scraps, and still have maybe a yard of that left, but I purposely bought extra so I can make a changing pad for the diaper bag. (Hopefully that will happen soon.) And since the rectangular soakers took less fabric than I thought, I have nearly 2 yards of the cotton fleece left over. It’s got a pretty rough texture on the outside, so I don’t think it’ll make a good sweatshirt or anything like that. But I have some ideas for non-clothes things I can use it for, if I don’t end up needing to make a set of large-sized diapers.

And since the whole point of this undertaking was to save us money long-term, here’s the breakdown: I ended up paying a total of around $350 for all of the supplies, which translates to less than $5 per diaper. It looks like the absolute best I can do buying the cloth ones new is around $6.67 apiece. I got this price off of a 6-pack on Amazon, and those are ones that have a bajillion snaps so you can try to make the same diaper fit the kid as he/she grows. Definitely cheaper, but I wasn’t sure how well they’d hold up from all of the washing. If I was getting the more sized ones like I made, it would be at least around $18 apiece. Which means I would have only gotten about 19 diapers for the same cost.

On the flip side, I did a little googling, and according to Mint.com, the average cost of 1 year of disposables is around $800. I know I’ll have to occasionally use the disposables for instances like church nursery/if Doug’s mom is babysitting for us, since I really can’t see her wanting to deal with these. (My mom is totally on board, though.) Even so, aside from the cost of detergent and my time in carting the laundry around/getting loads started and put away, using these as my primary means of diapering should pay for itself in less than 6 months. Which means more money for fabric, right?

the March round-up, and April/May plans!

I’m really liking these monthly round-ups. Since I’ve been mostly doing finished project posts lately, it’s a good way to keep tabs both on my stashbusting attempts and the longer-term projects/quickies that don’t necessarily need individual posts.

Projects finished this month: 6 total. There was the diaper bag, the skirt and matching baby pants, the top I blogged the other day, and 2 more baby projects.

Project #1, with backstory: The bulk of the clothes I’ve gotten for Hobbit so far have been courtesy of my mother-in-law, who keeps finding people who are getting rid of baby boy stuff and snagging it for us. For the most part, it’s been like-new or very gently worn, so I think we’ll be able to use most of it–though I did send a stack of newborn onesies to the thrift store, because they were specifically labeled 5-8 pounds. Given the weight updates I’ve been getting at my ultrasounds, and the weights that both Doug and I were at when we were born, he’d probably fit those for a week, tops. And I also passed a few things on to one of my best friends, because neither Doug nor I cared about keeping the sports-themed clothes (they never have hockey anything on them and he doesn’t care about any other sport), she and her husband actually like football and stuff, and she’s due to have a boy about a month and a half after me–instant friend for Hobbit! Yay! She had a girl for her first baby, so all she really needs for this one is clothes, and I don’t mind sharing. Anyway. There were also a few things that I thought were generally cute, and mostly in good condition, except for some obvious staining around the necklines. I had a little mental battle between my cheapness thriftiness and not wanting to dress my kid in clothes with mystery stains that he didn’t make. Then I remembered that I can sew, and therefore I can still get some use out of this stuff!

So I took these cute-but-stained pajamas, and this organic cotton onesie that was in excellent condition, but a little boring. And I cut the frog applique off and hand-stitched it onto the onesie–I wasn’t sure how well my machine would navigate those little tiny openings, since the side seams were already closed up! (The only before picture I have was on my phone. Yes, that’s Doug playing with toys in the background–if you follow me on Instagram, you know all about my excellent thrift score on a box of K’Nex over the weekend!)

Ta-da! Much cuter onesie, in about 20 minutes. And I still have other unstained parts of the original pajamas left–maybe I can hack the legs and sleeves into a little hat or something?

Project #2: Since hockey apparently doesn’t count as a sport in the minds of people who design fabric for baby clothes, I’m having to get creative. After all, if I can make geeky stuff for the baby, I should accommodate Doug’s interests too, right? So I used some fabric left over from the one hockey bib that I made a few months ago to make a project that I promised I’d do.

He mostly gets flak for being a Pittsburgh Penguins fan, since we live in Flyers country, but his other favorite team is the Colorado Avalanche, and it’s a lot harder to find pre-made anything for that team for some reason. Even on the internet. But I did find some quilt cotton. So now our kid has Avalanche pants. The pattern is Simplicity 1330, slightly adapted because I didn’t have the right size elastic and partially because I didn’t want to bother putting the elastic in the bottom of the legs. The waistband came out huge with the length they said to cut, too, and the casings weren’t cooperating well with my wider elastic, so I also cut a few inches off. Hopefully they’ll fit him ok–these are supposed to be 6-12 month. Otherwise, super-easy–I had these cut and completely sewn in an afternoon.

Stashbusting totals for the month: About 6 1/2 yards used up. I still need to figure out what to do with the rest of that Avalanche fabric, since I have maybe 1/4 yard left. I also bought 1 yard of quilt cotton from Jo-Ann’s, because it was another hockey-themed print, and I don’t see those often. Still, used more than I bought. So yay! Total for the year so far: 27.75 yards down, just under 360 still here.

The in-progress stuff: The good news is that the newborn and small-sized diapers are completely done! I just need to finish up with the mediums, and my mom got a good chunk of that done. So I just need to finish with leg elastic and snaps. It’s definitely easier (and less boring) doing that sort of assembly-line sewing with someone else. As for my Lord of the Rings-themed quiet book, I haven’t made as much progress on that, since a nice chunk of the time I’d normally be spending on that was spent on diaper snap installation. But I have finished up to page 5 of (I think) 11, aside from machine-sewing the backing page on two of them, and am working on the 6th. So I’m about halfway there.

How I did with March’s goals: Well, the diaper bag is done, and I managed to make 2 pieces of clothing for myself instead of one, so I did well! I haven’t actually started that massive cooking project yet, save making a massive grocery list and at least figuring out which recipes to start with. But that is definitely on the agenda for this month, since I decided that it would be better to wait until closer to the time that we would actually be eating this food. Less freezer burn that way.

April’s plans (and beyond): 
SHBsewalongbadge2 

I mentioned this sewalong in my last post, and since everything I’m sewing right now fits one of the three categories, the timing is perfect! I’m not entirely certain what order I’ll end up making things in, so I’m just going to list all of the sewing that I’m hoping to get done before June by category, and see what actually happens.

1) Baby Clothing
Not 100% sure of my plans here yet, though I do have some things set aside and some ideas.

  • I have a few knit scraps pulled out that should be just enough to make a baby t-shirt. I’m also planning on freezer paper stenciling it since both fabrics are plain–with a geeky reference, of course! 
  • I do have two more partially useable free baby clothes that could also get the refashion treatment. 
  • I also have a couple of patterns lying around that would be fun to try out. Including one for adorable soft-sole baby shoes, and a button-down shirt one that I recently acquired. I even have an old work shirt of Doug’s hiding in my refashion bin that I can use for fabric, and I think it would be cute (and free!) to cut down Daddy’s old shirts for little boy clothes!
  • And I guess finishing up those diapers can count as clothes, right? I mean, he has to wear them…

 
 2) Baby Accessories and Other Items, such as quilts, toys, burp cloths, bibs, etc.
I should be solid on bibs and burp cloths, mostly thanks to my mom!

  • But I do want to make a portable changing mat to go in the diaper bag, since I have fabric left over from that. 
  • I have a scrap quilt in-progress, which I’m planning on just using as a throw-on-the-floor play mat, but that’s probably lowest on my priority list right now. (A, he won’t be able to sit up for awhile, and B, that might be an ideal project to work in 5 minutes of sewing here and there shortly after he’s born, since it’s all stitching strips onto blocks.) 
  • The quiet book definitely counts as a toy, and I did get some suggestions about maybe turning the rest of that Avalanche fabric into a stuffed toy, via the Stashbusting Sewalong group on Facebook.
  • I also have leftover towel fabric from when I made a baby gift (for the same friend mentioned earlier) a couple of years ago, so I’d like to see if I can squeeze a hooded towel out of it. 

3) For Parents

  • I have one more nursing/maternity maxi I want to make, as mentioned in my last post. I think that, for ease/speed of assembly, I’m going to just mash up the Tiramisu bodice, which I’ve already made twice and I know has some room for expansion, and the already-altered Simplicity skirt pattern from the black dress.  Which means that I’ll probably do the invisible zipper nursing alteration trick again, so maybe a tutorial post will happen?
  • As mentioned in my last post, I may give that Megan Nielsen pattern another go, with a few tweaks, since I’ll need something sleeveless for the hot days too. 
  • Given the colors of either project, I can also use the scraps to alter a not-quite-nursing bra that I picked up recently. The straps are the type that can snap closed in the front, so it just needs a little tweaking. 
  • I also need to make myself a nursing cover. I’m pretty sure I know which stashed quilting cotton will be sacrificed for this cause, I just need to do it. 

Hopefully this isn’t too overly ambitious. But I’m determined to cram in as much time with my sewing machine as I can now, because I suspect it’ll be hard to do for awhile!