What’s it got on its pocketses?

Since finishing up my friend’s cape, I’ve managed to make a little progress on my coat, at least as far as construction of major sections has gone. It’s taking a little longer, for a couple of reasons:
a) This tweedy fabric frays if you just look at it–I’m really not exaggerating by much! So I’m having to go back and serge every raw edge once the seams are sewn.
b) The first page of the directions somehow didn’t make it back into the envelope after the last time I made this coat! So I’m having to really think through this and make sure I’m doing it right. I even pulled out my old Reader’s Digest Guide to Sewing as a reference just to make sure. Yay for sewing books!
c) I’m actually glad I did that, because it inspired me to add a detail to the pocket construction that I think will make this coat better. Also, I had to cut the pocket lining in the first place.
d) I also discovered that I sewed one of the pockets on in the wrong place, and had to rip it off and re-sew it to the right place. Which means I’ve just now finished the first two front seams, minus topstitching. Yikes.

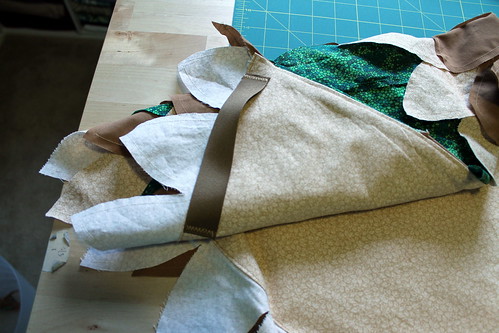
So that pocket detail… I added a facing to the lining fabric portion. (One side is cut from the actual coat fabric.) I was originally planning on lining the coat in this lime green silk crepe that I bought for the wedding and then couldn’t use. But I had this royal TARDIS blue Bemberg lining that I bought to attempt to line the Darling Ranges dress that I was originally thinking of making this fall. (At this point in October, I’m thinking my best bet is to drop that part of my FESA plan and save it for going into next fall. Again.) A little Twitter conversation confirmed my thought that fully lining the dress might be more complicated than helpful, particularly for the bulk of the gathered skirt. So I commandeered that particular piece of fabric for the coat lining instead, because I think it will slide over sweaters and the like so much more nicely. (Now I still have to come up with something to do with 3 yards of lime green silk. Help?)
I was worried about how the lining would hold up against the strain of pulling my gloves in and out of my pockets, especially with the thicker tweedy fabric. So I basted a leftover scrap of my organza, cut on the selvedge, onto the seam line of the two pocket pieces…

…and then stitched on a piece of the coating. The edge facing the inside pocket is serged, of course, because of that fray factor.

A small detail, I know, but even though the front isn’t pressed yet, I think this is helping the pocket to lay much better. And it looks a lot more professional to not have that blue peeking out!

I don’t think I’m going to go all-out tailored with this coat, because it being halfway through October means I’m feeling pressured to get this done. Especially since it’s been oddly warm and the temperatures are set to plummet this weekend, which means I’ll be freezing my butt off at work next week for sure. So if I try any more super-tailored details on this one, I think it’ll be attempting the bound buttonhole thing. I just can’t see a regular stitched-and-cut buttonhole holding up for too long on this fabric. I guess I’ll have to figure out when in the process to do that, so wish me luck! I think I’m at least caught up to the point where I have directions again. So that’s something.

a little owl cape

The nice thing about sewing on Saturdays is that I can instantly post! I literally just finished this project about 10 minutes ago, minus photography/writing time.

Anyway, as I mentioned in the last post, a friend of mine emailed me while I was on the Paris trip to ask if I’d be willing to help her out with a Halloween costume for her foster son. I’ve made some capes for her before, for her own boys and her nieces/nephews, and the idea was pretty cute, so it was hard to say no! The boy loves owls, and really wanted to dress up as one. This was the inspiration link she sent me. And she bought the owl mask herself, so my only responsibility was the cape.

Owl cape, frontAnd this is what I came up with. I made this one a little differently than the others, mostly in that it involved a half-circle rather than a rectangle. The bottom-most level of feathers is the cut edge of the cape, but all of the others were cut and sewn on. I was also able to use all stash fabrics! The boy’s favorite color is green, so I was glad to find a piece of cotton that didn’t have a girly-looking print on it.

Owl cape, backAnd here’s a view of the back, as best as Donna could model it. I’m sure her shoulders are wider than a little boy’s! I left all the edges of the feathers raw, because it would have taken forever to make this otherwise, though I stitched the edges about 1/4″ away from the edge to prevent too much fraying as it gets washed and worn. I figured a little fraying would actually be ok for this one, to soften the feather edges! The rows of feathers are just zigzagged on, so I did add the lining that you can see above in order to hide that. The rows got pretty crooked in some spots! I know there’s this huge span of tan at the top, but honestly, I ran out of the green so I had to improvise!
Owl cape liningOne more detail my friend requested was some “handles” so he could use that to spread his wings. I made them pretty wide in order to accommodate growth, but it’s just two pieces of ribbon stitched on so that the feathers above it were left free (minus the hem feathers, of course.)

I sent her some pictures in progress and she was excited about how it was turning out, so I’m hoping the boy loves it! This was more of a fabric hog than I thought, too– I only have scraps left of the tan leaf print and the darker brown. So all in all, about 3.75 yards of fabric. I’ve been remiss in keeping track of the numbers on my spreadsheet lately–I still have some subtracting to do for the DragonCon projects and my TARDIS bag. So I’ll have to catch up on that soon so I can at least see how I’m doing on my Stash Diet at the end of the month!

Are you doing any Halloween costumes this year? Or are you all too busy sewing your fall and winter stuff, like I need to start doing?

the slowest of sewing

I figure I’ll have to do a few more in-progress posts for awhile, since I’m not speedy enough to whip out a winter coat in no time! Also, I’ve gotten a little sidetracked by a sewing request from a friend that I couldn’t pass up. (Because it’s costume-related and for a little kid–how could I say no?)

All I’ve managed to get done on my coat so far is to cut the outside and underline the pieces. My fabric doesn’t look like a loose weave on the table, but when you hold it up to the light, it tells a different story!

If that much light gets through, it seems reasonable that winter winds could do the same! I had a large piece of silk organza left over from making this dress, because I seriously overestimated how much I would need to underline it. I also ruined the light color of it back when I made that dress, because I threw all of the fabrics in the wash together and it turned sort of an uneven, hand-dyed-looking grey. So I didn’t want to use it as a press cloth, and I couldn’t use it for any interfacing-type roles on lighter colored fabrics. However, I did have just enough to squeeze most of the outer pieces of this coat onto it, minus the two front pieces. (They were supposed to be interfaced anyway, and overlap when the coat is buttoned, so I was ok with making an exception there.)

The grain may be wonky on a few pieces here and there, because if you’ve ever worked with silk organza, you know how it shifts. At first, I tried cutting out the pieces and then basting it onto the main coat pieces, but of course things were shifting like crazy. So since the fabric itself has a bit more grabbing power than the usual things I underline, I tried a different approach: laying the pieces directly on the organza, basting them on, and then cutting them out. The other advantage to this was that I could tweak the layout to fit as many pieces of the coat on as possible, since I was working with leftovers!

The pieces are all cut out and ready to go, including the two interfaced front pieces. I’m hoping to finish my friend’s project–an owl cape for her foster son to wear for Halloween/his early November birthday–before the weekend is over, so I can give it to her on Sunday. I do have a little sneak peek of that, aside from what I’ve been posting on Instagram here and there, because Doug got bored while I was working on this last weekend and started goofing off with my camera. I guess a good side effect of our Paris trip is he’s a lot less nervous about using it now!
So many feathers. But the good thing is that I was able to completely bust a few pieces of quilt cotton from my stash!

And a little peek at me in my sewing room. It had been awhile since I had a nice chunk of weekend time to sew, so I was a happy girl!

The feathers didn’t go quite as far when I pinned them on for real after edge-finishing, so I cut out what I hope is the last of those last night. The only work I have today is teaching a couple of lessons, so I’m hoping to get those edges done so I can finish up the sewing ASAP!