
Jeans have long been a defining staple of my style, and I’ve honestly missed making them (and wearing ones that fit) since the boys came along. So when I saw the Mountain View pull-on jeans by Itch to Stitch— and particularly a tester shot that showed off just how well they don’t gape in the back– I was sold. I haven’t been feeling ready to go through the fitting process for, say, the Ginger jeans that I’ve been hoarding, but elastic waist stretchy jeans? That, my mom bod can handle.
I do have to say, this took a lot longer than I expected. I actually started this project back in August, and intended all along to do a fit check before working on all of the details. But then I heard a Love to Sew podcast episode just after cutting it out where Brooks Ann Camper was talking about hand-sewing and not overly handling the fabric, and kind of on a whim, I decided to hand baste the jeans together. I still think it was the right move, as the denim I used was one that had been sitting in my stash for a few years because it was a lot lighter weight than I wanted. But it does have the 30% stretch that this pattern calls for, so I figured it would be the perfect test fabric. The machine basting and ripping out process probably would have weakened the fabric quite a bit, since I had to make some significant changes.
The back is where it’s the most noticeable. The dark stitching was the original seam lines, and the yellow is the changes I had to make. I ended up having to pull the back in about an extra 1/2″ starting from the back and going through the yoke, and then taking an additional dart in the waistband that is actually in the finished product. I’m going to see if I can smooth that out in future versions. I also ended up changing the rise slightly by reducing the seam allowance between the yoke and the waistband, and while wearing them and sitting down to write this, I think that was a good move.
Additional changes I made: I added a little extra width to the hips (about 1/4″ total, I think), and pulled it in around the knees to give it a little more of a flare effect– bootcut/flare jeans are still my favorite, and the straighter leg that this originally had just looked really baggy and ridiculous on me when I tried it on. A nice feature of these jeans is that there’s an additional back leg seam to help with fitting adjustments, so I was able to take it in at the back of my knee quite easily.

Once I figured out the fitting changes and adjusted my pattern (look at me, being all smart and doing the adjustments right away, the actual assembly process went quite smoothly. Figuring out what to do with the pockets was a little tricky. I did all of the topstitching in the same color thread with the triple stitch, but I ended up deciding on a design from one of the templates in a free download from Closet Case Patterns. I’ll be honest, the pockets were my one quibble about the instructions for this pattern. The order of assembly on there has the pockets as the last thing, after the legs are all stitched together and the waistband is on, and that seems unnecessarily difficult to me. I went ahead and sewed them just after the center back leg seams, before doing the crotch or inseams or anything, but I can see that being a tricky point if you’re more of a novice in sewing pants.
So are you ready to see the results?

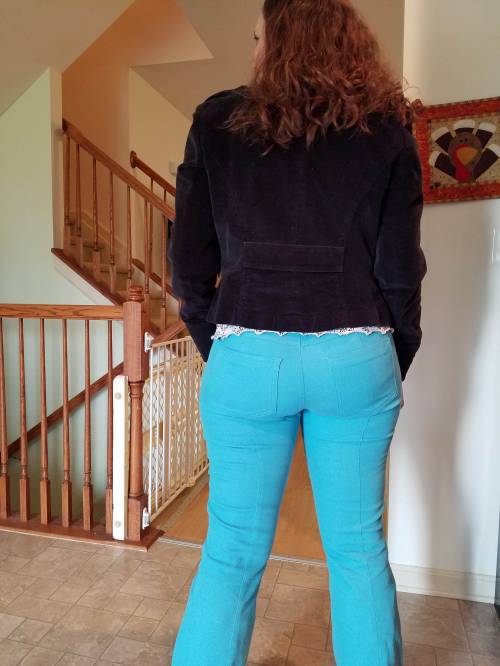 Here you go! Overall, I’m pleased with the fit, though I think that maybe I should have made the elastic just a little bit smaller. We’ll see if it ends up bothering me enough to remove the waistband and fix it later. They’re actually quite comfortable for a high rise pant, and the elastic content means it won’t restrict my breathing (crucial when your instrument is a woodwind!)
The back view. I think that in the future, I might move up the back pockets about a half inch or so, because they seem just a little low to me. But look at the flare!! The back seam blends in really well here due to the tone on tone stitching, but I can see that being a fun detail to highlight.
I would definitely make this pattern again, and am now curious about some of the other patterns from this designer. She has some really lovely tops! I do have one other piece of denim in my stash, in the more typical indigo color, that seems to have the right stretch amount for this pattern. But it’s also more narrow than the typical denim, so I’ll have to see if I can tetris it out. Honestly, I think that is probably the most difficult part of this pattern, aside from just working out the fitting– finding the right fabric! It seems like most denims cap out at around 15% stretch, and with the nature of the wide elasticized waistband, I’m not sure that just sizing up a little would be sufficient. So I may have to branch out to some corduroys and twills to see what I can do.
For the record, I’m still planning to try those Ginger jeans at some point, once I’m certain that we’re done with kids and my weight is stable. But this works well to give me my fix now. And I think that the color will help to brighten up my winter wardrobe very nicely! (Now I just need some print tops with this color, because how do I not have this happy turquoise?!)
Also, the other reason that these jeans took longer than expected is because I took a break in the middle, which is not typical for me on a project. But the opportunity came up to write a post for the Sewcialists blog’s Sustainable Sewing theme, which went up yesterday. So if you want to see my latest Refashion Redemption Project piece, go check it out!
 Hobbit is completely obsessed with dinosaurs. It’s lasted over half of his life so far. Padawan is pretty much into just taking whatever toy his brother is most interested in at the moment (ah, the joys of toddlers), so I haven’t picked up on any particular preferences. So my original thought was to make Hobbit a dinosaur costume and dress the little guy up as a Jurassic Park ranger or something. I even have a sewing pattern for a dinosaur costume. But the time just seemed to get away from me, so I decided to go the route of a Halloween costume that could be worn over and over again, to make it more worthwhile. I’d been hoarding
  Another thing I like about this company: They make stuff that’s also for BOYS. It’s honestly ridiculous how hard it is to find sewing patterns for boys compared to girls, but everything I’ve seen from them is pretty gender-neutral. And a lot of animal themed stuff, and what kid doesn’t like that?
 Anyway, here’s a slightly more in-depth review, since this was my first time making one of their patterns. Construction was straightforward, and aside from some page-flipping to jump around to the different directions, since some skipping is necessary depending on what animal is made, I didn’t have any trouble following the directions. Probably the most difficult part was the dinosaur spikes*, mainly because I had to do a little extra work and seaming to get everything where it was supposed to go, and the directions didn’t entirely reflect that. I didn’t have any trouble figuring that out, but a more beginner sewist might need that clarification.
 Trying to figure out how to close these coats up took some consideration. There are some nice instructions for some loops to go around large buttons, but getting these two to stay still long enough to actually work a buttonhole is a feat of Herculean proportions. So after some discussion with my usual sewing sounding board (aka my mom), I settled on giant snaps with buttons on the outside for the aesthetic. It does make closing the coat very quick, which is helpful, since the whole process of getting shoes and coats and all the other things together to get out of the house usually involves at least one wrestling match and/or high speed chase! #boymomproblems
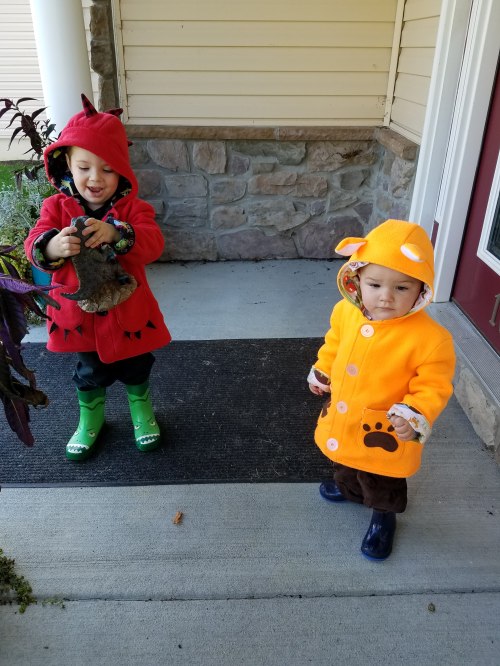
 I know Hobbit likes the coat, at least outside of the car, because the couple times we’ve been to a playground since I made it have generally included a lot of stomping and showing off his roar and telling everyone that he’s a T. Rex. (Though he did make a point of telling me early in the process that T. Rexes didn’t really have spikes. Part of me wishes now that I’d left those off, but I doubt the tail alone would have conveyed the dinosaur element.) Padawan just doesn’t like putting a coat on, but so far, it doesn’t seem to bother him once he’s outside, most of the time. The tail is admittedly a little long for him, since he’s on the small side for his age, but hopefully he’ll grow into it soon. And so far, they’ve gotten a ton of compliments on their coats, at least from adults that we run into. Overall, I’m feeling good about our little everyday wearable costumes. And I’m glad that Halloween turned out to be a pretty nice day weather-wise, so I could get these photos while letting them burn off some energy in my parents’ backyard!