Fall preview!


I spent some time digging through my stash the other night, and I think I’ve got something resembling a plan for my upcoming projects. I figure there’s about 10 garments I want to sew before the end of the year–now that it’s almost August, I’m turning my attention more towards fall clothes. It’s part of my ongoing attempt to be smart and sew things before the end of the season I want to wear them in. (Plus I need to make a bag for the fall, and if at all possible, something to carry my beach umbrella in before, oh, next weekend. The cheap plastic carrying case that came with it fell apart at last. Though I really can’t complain…after all, I got the umbrella for free!) So here’s what’s coming…

This one is in progress, actually. I made the muslin the other day, and came up with several fitting tweaks. But I’m thinking that, if I can pull it off ok with the plaid, this shirt is going to be really fun! Even if it’s not my usual color scheme. (The plaid will be fine, I think….after all, it worked for the Burda magazine people. Of course, since they seem to be making a move towards clown fashion according to the next preview, whether this is a good thing is debatable.)


From sew and so
This one is going to have to be next, I think. I’ve had this fabric for years–possibly since college! And it hasn’t managed to make it into something yet. So I’m going to make the cardigan here, or perhaps a modified (i.e. longer) version. This knit is just so lightweight that if I delay it too long, I won’t get any use out of it. But I think it’ll make a nice summer-to-fall transitional layer. (Besides, I’d meant all along to finish it this summer.)

From sew and so
The colors on this picture aren’t quite right. At least for the solid. It’ s a little more teal. I’m going to make a skirt with the teal (mainly to test my skirt sloper and make sure it actually fits all right–based on an incident involving unsuccessfully .using it to alter another skirt pattern recently, I’d like to check that before I cut any other skirts out! (Especially since apparently the skirt sloper is a foundation to making a pants one….and you all know well by now that me and pants-fitting haven’t quite learned how to get along yet.) And the print is just so sheer that it has to get made into something before it gets cold.  I have a pattern potentially in mind for that one, but need to figure out if I can add sleeves.

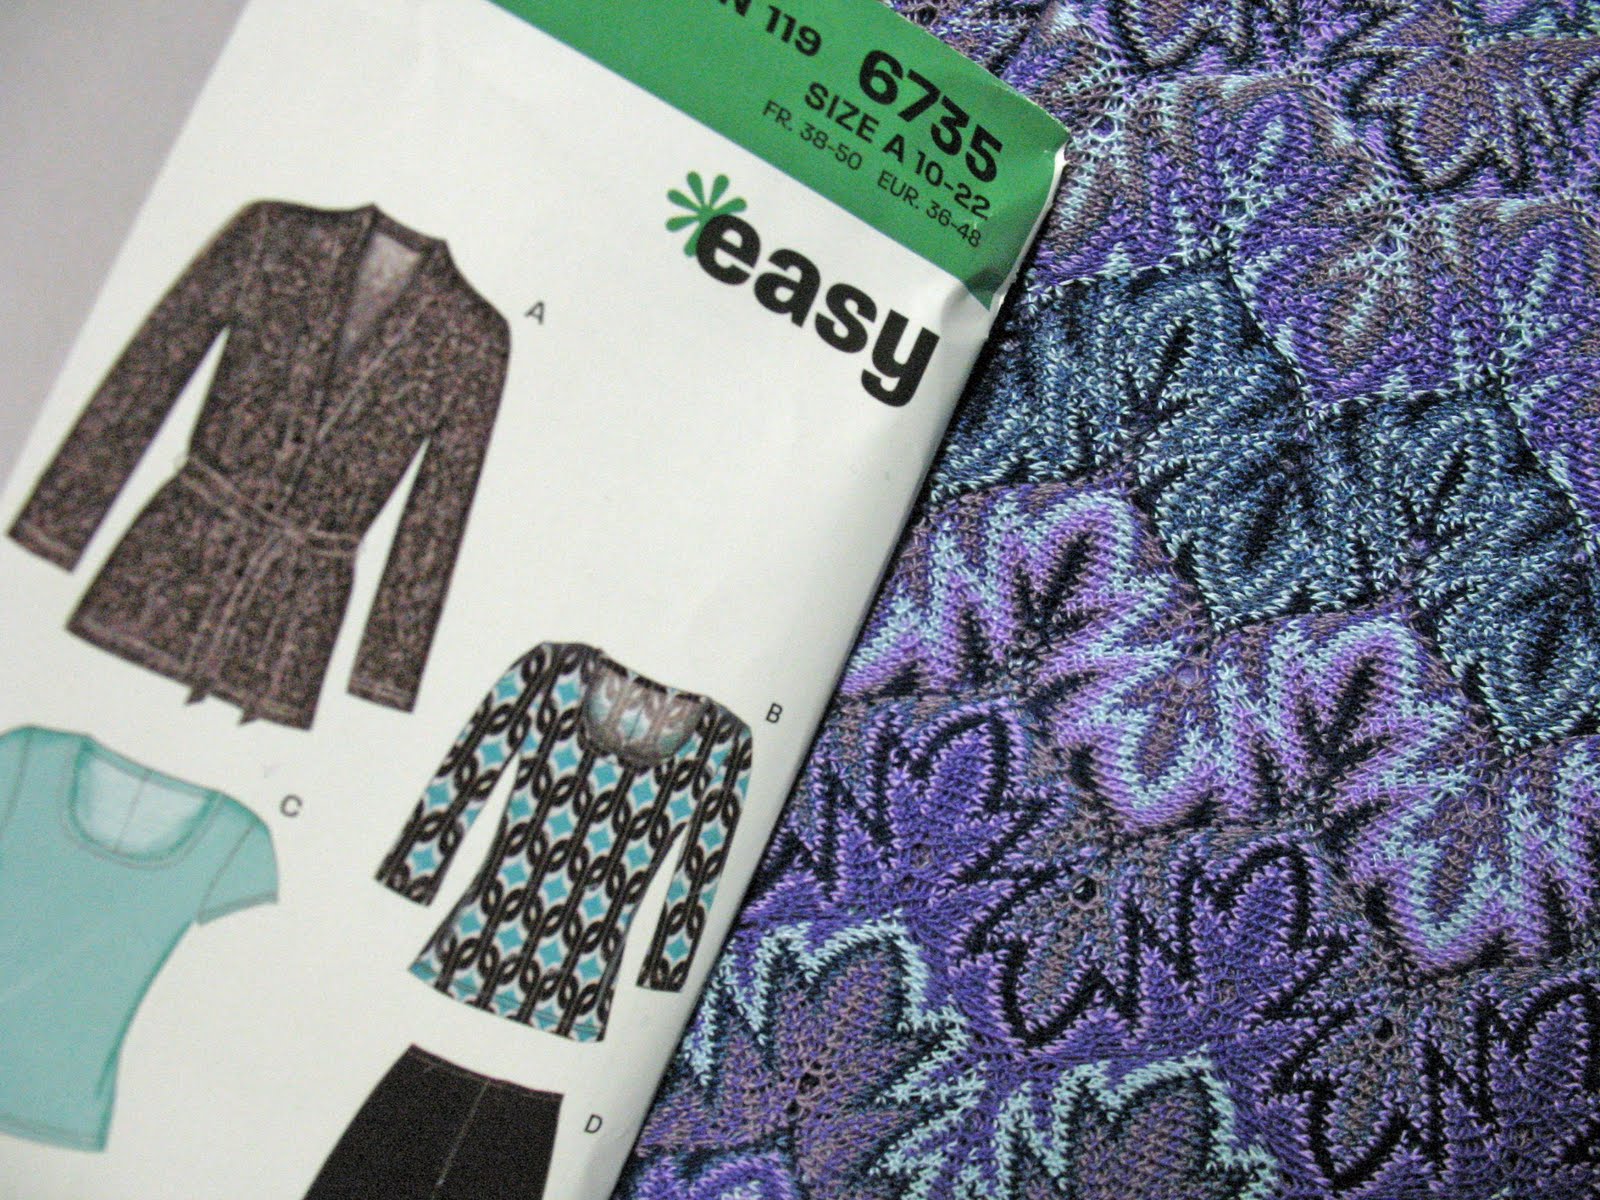
And last but not least, this.


I’m hoping this is the year that I finally turn this into that jacket from the March 2007 Burda mag that I’ve been eyeing for at least the last year and a half…or whenever I special-ordered that issue.

Edit: I almost forgot…bet you’re all wondering what the deal is with that jeans muslin, aren’t you?  Well, the truth is, I’m not really sure at the moment. It was at the point where no matter what I did to try and get them to fit better, it didn’t work, and I had even the class instructor baffled. So she messaged me to ask if I could send her the actual muslin, which I did probably about a month ago, along with whatever measurements I thought was pertinent. I haven’t heard anything back yet, so I’m thinking maybe I should write to her and ask her if she even got it in the first place….otherwise, I have to start from scratch again! Guess it’s a good thing I actually do have a couple of pairs that fit decently right now. Thank you, Goodwill.

A little bit of catching up

I can finally post finished project pictures again! Ok, so I could have posted this one sooner. I just didn’t get the picture until this morning. So now I’m going to debut my “Mony Monet” dress (named thusly because the print made me think of Impressionistic art…and then I got that song stuck in my head.)

Pattern: Simplicity 2359

Pattern Rating: Highly recommend

Pattern Description: Dress pattern in two lengths with sleeve variations. And pockets, which automatically makes it better.

Pattern Sizing: 12-20. I took a chance on cutting the 12 and I’m glad I did!

Did it look like the photo/drawing on the pattern envelope once you were done sewing with it? No. Mine looks better. 😉

Were the instructions easy to follow? This was my first time using one of the Project Runway patterns, and I was pleasantly surprised. My last experience with the “design your own”-ish patterns was one of those DIY Style ones from McCalls, and that one was kind of annoying. This one was very well-laid out, and the explanations of how to do different sewing techniques would make it a good starter pattern line for a beginner.

What did you particularly like or dislike about the pattern? I liked the neckline–even though it plunged a little lower than I usually go for, the sweetheart-esque cut made it just modest enough so that I could get away with not raising it. (And without being too 80’s about it.) I do wish the pockets had been a bit deeper, since I can’t actually fit my entire hand into it.
 
Fabric Used: A polyester with a shantung-type weave. And also a solid poly shantung for the black portions. And a lining. Which was probably also polyester, because that’s just how Joann’s rolls.

Pattern alterations or any design changes you made: I decided to take the chance of just jumping right into this one without making a muslin, because I’ve been doing a lot of muslining this summer (especially that ill-fated jeans muslin, which I will elaborate on shortly), and I wanted to just SEW something, darn it!! It actually fit me quite well without alterations, although if I was doing it again, I think I’d see if I could get the front bodice to flare out a bit less. I did add a skirt lining in case of fabric opacity issues, instead of just lining the bodice. And I did hand-stitch the straps closed and to the bodice, rather than topstitching it on the machine. I don’t always like the way that looks, and I’ve found that it’s really easy for the straps to get distorted with little bits of seam allowance hanging out.


Also, I originally meant to make this the maxi-dress version, but with the fabric, it just screamed 1970’s bridesmaid dress when I had it laid out on the cutting table. So I chopped the skirt before I even sewed it..

Would you sew it again? Would you recommend it to others? I probably won’t sew it again, because I rarely sew the same dress twice. But I would recommend this to others.

Conclusion: Now I’m feeling more motivated to try out those couple of other Project Runway patterns that are in my stash!

I guess that technically, this one isn’t entirely finished. I didn’t sew a hook and eye on the neck yet. But I decided to just wear it to church yesterday without it anyway. After all, my church keeps the building so ridiculously air-conditioned that I knew I’d have to wear my shrug over top and no one would see that the black bit was slightly gapping. 


Now comes the question I’ve been running into all summer….what to do with the leftovers? Apparently I overestimated how much I’d need for a maxi-dress to begin with, and then I have two or three vaguely skirt-shaped pieces left from the part I cut off the bottom of the original skirt. So I probably have at least another two yards of this print!! 


I also finished my biggest challenge in the Elements series: Fire. I strung this one together last Wednesday or Thursday, just in time to wear it with my outfit for the band camp concert last Friday (featuring one of my recent thrifted tops that has actual red in it.) I’m proud of myself for actually managing to almost entirely pull this from the bead stash– the spacer beads, the smaller beads, and those “aurora borealis” beads all came from the stash. The pendant was sort of purchased new, but not specifically for this project– I saw it on clearance at Joann’s sometime within the last couple of months and liked it. And then decided that the design was vaguely flame-like enough to work for a stylized idea of fire. The red beads in particular make me happy– the smaller beads tend a little more towards a goldish orangeish red, and since the other ones have a little bit of blue when the light hits them in certain ways, it pretty much covers all of the fire colors. 


I’d had the thought not too long ago too that it would be good for me to have a red necklace to spice up more black outfits, so this should fit the bill nicely.


Also, one last note on the BurdaStyle book coat: As of this afternoon, it is out of my hands and on its way to NYC. Which means I’m free to sew other things again, hurrah! So I will be muslin-ing tonight (hopefully the last one for awhile), and possibly plotting an order of intended projects. Now that it’s almost August, I’m getting in the mood to consider some of my fall clothes. And that seemed to help me for this summer, because I finished all but three things I’d had plotted, and two of them will transition into fall rather nicely. (And, well, I didn’t get to the refashions I’d hoped to do, but some of them could still happen.)

The BurdaStyle Book Project, part 4: The End

That’s right… I finished it this morning. (Around 1 AM.) And it will be shipped out this afternoon after work.

I’m having mixed feelings on the finished product, honestly– I like the styling of it, but I’m feeling somewhat like perhaps it wasn’t the best pairing of fabric to pattern. Things aren’t lying as smoothly as I’d like them to, at least on my sewing dummy. (I took a few photos for my own personal reference, though I can’t post them here for copyright reasons.) And with the bottom part of the coat, it’s not quite laying right with the lining either– it’s like the faux suede has just enough stretch and drape that it’s distorting when paired with the strictly-woven brocade lining. But there’s nothing I can do about it– I pretty much have to ship it today. And I’ve already put hours into this coat.

I’ll just have to trust that I’m being too overly critical of my own work, and hope that it’s what they’re looking for.

I’ll probably be posting again soon– I have a finished dress that I hadn’t posted yet from before when I started the coat (though I hand-finished the lining in the midst of this), and I finally made the final pieces for my “elements” jewelry project. In the meantime, I’m probably going to spend my workday plotting fall sewing– I have a bin full of fabric and pattern pairings, and an already-cut muslin sitting on my machine for a blouse from a Burda magazine. So I’m thinking that might be the project of the day– just need to get it fitted enough to see how it will work with the plaid I have in mind for it. And since it’s a muslin, I don’t care if it’s perfectly stitched.

The BurdaStyle Book Project, part 3: Moving right along…

My plan all along for today was to pretty much sew all day and get as much knocked out as possible. I didn’t have much time at all to sew this week, except for Thursday night, which was when I stitched down that trim. This is how my sleeve turned out, and I think it’s pretty good! Except that I forgot to check which way the crossovers were going–so they’re the same on both sleeves except for mirror images like they probably should have been. Oh well…. I decided that leaving it would be the best thing, because ripping it off and starting over on the one sleeve would likely ruin it, and as long as it took me to iron that blasted bias tape and get it taped on, I didn’t want to cut a new one and start over!

So, as of today, the entire outer coat is sewn together.. Not bad, for basically starting with just the two front pieces and the back piece assembled.  I still have to sew the lining in, but I’m hoping to knock that out by next weekend. We’ll see how it goes–I actually will have several weeknights next week with reduced teaching loads, due to vacations and whatnot, so I’ll have more evening time than usual. But then, it’s also my annual week of vacation from the garden center job to teach flute at the middle school band camp hosted by the local university. (I think I need to work on understanding the meaning of that “vacation” thing…) So even though I’ll have the time, whether I have the energy and/or brainpower remains to be seen!

I probably could have gotten more done today. Except that the sleeves took me awhile, with all the pleating and pinning (and unpinning and re-pleating, in one case, since I pinned them inside-out! Fortunately, I realized that before I sewed it.) But look how good it looks!

And, well, I also got slightly sidetracked for a bit tonight… I was going to sew some more after dinner, but since I’d been working on it nearly non-stop since 10:30 before I stopped for dinner around 6 (except for lunch and laundry), I decided to leave it at the good stopping point of getting to the facings and linings. And I’m kind of getting in the mood to work on scrapbooky things again…

I actually did do some paper-cutting and basic page assembling about 2 weekends ago, because I was dogsitting. And this dog is the type who will drop slobbery balls right on top of your craft projects, so no way was I letting this coat anywhere near her! Besides, I still needed to trace out and alter the pattern pieces…which I did go home for several hours to do. So the scrapbooking is what I did at the house. And then, for the last couple of years, I’ve had a “scrapbook rewards” credit card as my one and only credit card. (No Joann’s one available at the time. Or now, when I’ve decided to move on to something else. Somehow, my mom managed to snag one when they did have it, and gets gift cards as a result. Lucky her.) Well, I’ve pretty much exhausted the interesting rewards on there, and have decided to close the account once I get my new card in the mail. But first, I cashed in all the points I’d built up that I could, and got a huge package this week of stuff like paper embossing templates, alphabet stamps, embellishy things (which I very, very rarely buy) and a couple of idea books. So the bug is definitely back now.

I had the thought today while I was sewing that I should go through my paper stash and get rid of all of the stuff I’m unlikely to ever use–a lot of my paper came from people who tried scrapbooking and don’t do it anymore, or those value packs of 100+ sheets that you can get sometimes at the craft stores. And while I’ve gotten a lot of good stuff that way for less money than I would have buying individual sheets, there’s a bunch that weren’t really my style. Not to mention some of the leftover paper from when I first started doing this in high school! So if I haven’t used it in about 12-14 years, it’s most likely not gonna happen. I’ve learned that when I’m actually in the mood to clean and/or organize, I’d better take advantage of it, because that doesn’t happen much. So I went through all of my patterned paper, and while I didn’t count individual pieces of paper, I pulled out enough to make a 2 1/2″ stack according to my seam gauge. (Probably a quarter of that is pink… I had a pretty significant amount of pink stuff from the paper stacks because I don’t use that very often at all– I probably got rid of at least 2/3 of that! And most of what I kept also had a good amount of other non-pink colors in the prints.) And I went through all of my stickers, too, and pulled out a bunch of those. I hardly ever use stickers anyway– I could probably get rid of the entire stash and not notice. But I’m not. Yet. I put a notice on Freecyle and am hoping someone is willing to take it!

Au revoir, Jane….

This is what I woke up to this morning– a huge tear right in the middle of one of the seams on the shorts I made as part of my BurdaStyle Jane pajamas! I knew they weren’t going to hold up a super-long time, because the first time I washed them, I noticed that the seams were fraying rather badly despite the pinking that I put on them. So this really isn’t fixable, because it’s not so much a tear as that the fabric has literally frayed down to the stitching and beyond. I’d hoped they’d make it through the summer, at least…oh well.

So I’m going to treat this as a learning experience, and this is what I’m taking from it: First, if the fabric is this easily frayable, I really need to take the time to finish the edges. (My serger was in the shop when I made these, admittedly, but some zigzagging might have helped nicely.) Also, I probably should have made this one size larger–the top fits decently, but the shorts were just a liiiiiiiiittle bit on the snug side. So I think a reprint of the pattern is in order.

Though I am a little on the low side as far as my stash of summer sleepwear goes, I’m not crushed….they were cute, but it was just fabric from my stash that, as I said before, I’m not really sure what possessed me to buy them. And, I mean, they have pink on them. So I think I can consider this a muslin and just use a better print the next time. 


In jacket-sewing news, it’s progressing… I’ve slowed down a bit this week because of some bias tape trim issues. Namely that suedecloth makes awful bias tape. The edges just don’t press under that well, and it doesn’t curve all that great. I had to completely change my original sleeve embellishment idea because the fabric simply would not accommodate it. But more on that later….as of now, the front pieces and the back pieces are sewn together, but the front and back are not sewn together, and the trim is all taped onto the front and sleeves (with a water soluble tape– not quite the same brand that Oonaballoona recommended, but this stuff will dissolve if I ever need to wash the jacket, so that’s good.) So I need to stitch that down before I can go any further. I’m hoping for a really good sewing day on Saturday, so we’ll see how it goes!

The BurdaStyle Book Project, part 2: Mmmmm, fabric.

I finally have the pictures to show the yummy fabric that I get to work with for this project. The fabric on the right is what BurdaStyle sent to me– 4 yards of suedecloth from MacCulloch & Wallis. Mmmmm, European fabric. It’s soooooo buttery soft that I just want to sit here and pet it. But, of course, then I’d never get the coat done! It really has the texture and weight of a real suede (albeit a really thin one), so I realized almost right away that I am most certainly going to have to line this coat, or I have no hope of getting it on over any other article of clothing with sleeves, ever. So I went to Joann’s earlier this week and came home with this fabric on the left– a lovely brocade with a background that is the perfect match of this odd shade of grey. It’s kind of blueish-greyish-greenish…and let me tell you, it was a PAIN to match the thread on this! BurdaStyle actually sent me some but it was way too dark–I’m guessing a victim of computer monitor color discrepancies. So the fact that I was able to find a lining to match so perfectly at my one and only local fabric store is a minor miracle. And the fact that it’s also a print makes me rather happy–it’ll be a fun surprise when the coat is opened up.

I’m a little behind on my original schedule– thanks to some ridiculous delays at the DMV, I didn’t have time to cut it out on Thursday as planned. So I cut it out on Saturday. And I’m glad that I had to add my own seam allowances on this pattern, because that made it really easy to keep the pins within that. I am going to have to be super-careful on pinning and sewing this, because as you can see, this fabric is going to show everything. 

 I’ve worked with suedecloth before, but it’s generally been more along the lines of the polyester stuff that’s not really as genuinely suede-like. So, armed with my new fabric manual and some scraps, I decided that it would be best to do some testing before I work on the actual coat pieces– I do have a decent amount left over after cutting, but I forgot to take into account that I have some trim to cut out of it still. So this was my seam-pressing experiment. The one to the right was the most successful; for this one, I pressed it from the wrong side on the lowest temp with a bit of steam and a pressing cloth. Doing it from the front makes the seam edges show too much. Not to mention iron marks.

Speaking of the trim…this was my experiment on that. I’d thought that maybe I could take advantage of the non-fraying qualities of the fabric and just leave the raw edges (the top bias strip), but I don’t think it’s going to work. There’s too many skipped stitches, and it just looks kind of sloppy. I did more of a traditional bias tape on the bottom, with pressed-under edges, and that one both lays and looks better. The only problem: my original design plan was to use this self-fabric bias trim on both the front and the sleeves, and for the sleeves, I may have to rethink my design plan. The fabric really won’t curve that much, even cut on the bias.

Hoping to start some actual sewing tomorrow afternoon!

The BurdaStyle Book Project, part 1: Testing, testing…

First of all, the disclaimer: there’s going to be a lot of pieces missing as I post about this project. I can’t post pictures of the sketch or the finished product for copyright reasons. But I do have permission to post pictures of the process from BurdaStyle, so here we go!

I wanted to make a muslin of the coat before I started, both to test my changes and to try out the basic construction before I cut into the yummy faux suede that they sent me to work with. (Pictures of that to come.) So I got the body of it basted together last night (ignore the unfinished dress that Donna’s wearing underneath….hopefully I’ll find time to actually hem that thing before July is over! And, um, ignore the fact that the pleats are facing in the same direction on both sides of the front…they’re meant to pleat towards the hips on both sides. I’ll fix that on the real thing.)

I’m glad that I did try it out first–while the fit of the main body is just about perfect for me with no alterations to the pattern sizing, I did make some changes to the pattern pieces in the back. And after seeing this, the main back pieces below the yoke are now altered so that they’re not so wing-like.

Another change to the original pattern that I made was to add more fullness to the sleeve cap. I got some instructions on how to actually do that from this book,  and it’s working out pretty well, actually. My original thought was to gather them, like it does on the original pattern, and then just have a puffier sleeve. But I recently used up a Barnes & Noble gift card on this book (partially because of this project, but I figured it would be a good overall reference to have in my tiny little sewing library), and one of the things it specifically said is that faux suede generally doesn’t ease well. So I made a modification to my original idea and decided to carry the pleats into the sleeve cap instead.

This is the result, and I really love the look of it so far! The suedecloth is fairly heavy and drapey, so I’m hoping it translates into the finished design ok. I’ve got some ideas on how to add some support to those sleeve caps, though.

My plan is to get as much of this done as possible in the next week and a half. I have the band camp that I work at every summer starting on the 19th, which means I’m also going to have some rearranged lessons to deal with. (Along with a lot less energy and mental clarity to draw from in the evenings, I’m sure… I enjoy the camp, but by the end of the week, I generally feel very much like a zombie in need of braaaaaaaaaaaaaaaains.) So I’m going to be leaving to teach my one away-from-home lesson of the evening soon (more rearranged schedules…ah, summer), and am planning on stopping at Joann’s on the way home to pick up some much-needed lining, as well as see if I can hunt down something that will help me position some details without pins. Then I can get all of the fabric washed tonight, cut it out either tomorrow or Thursday (pending a get-together with my best friend from high school, which we’re still discussing details on), and get some actual sewing in starting on Friday!