Pattern review: Simplicity 1469

Simplicity 1469
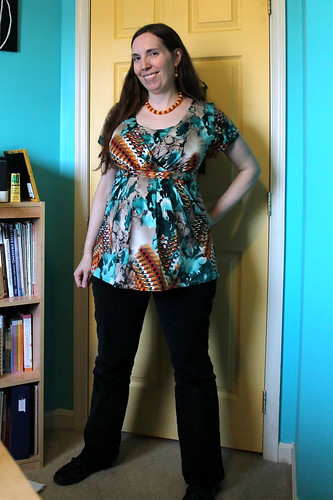
AKA, the Megan Nielsen nursing/maternity top. Though I’m linking to the Simplicity version, since that’s what was available to me, and therefore what I used. Not quite so stealth maternity from the front as my last two makes for myself, is it? I’d originally planned to draft a pattern for this fabric from this thrifted/refashioned tunic, since I’ve had that for years and it’s been working very well as a maternity top. I think it would work well for nursing, too. And I was hoping that if it worked out, I’d be able to wear this fabric anytime, pregnant or not. Well, I did draft the pattern, but ended up not having enough fabric to try it out–I wouldn’t have been able to do any length sleeve on this. So this was plan B.

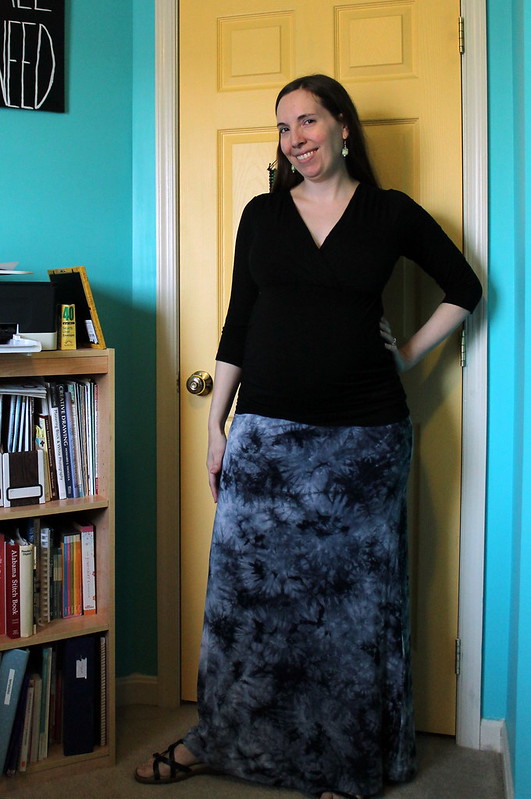
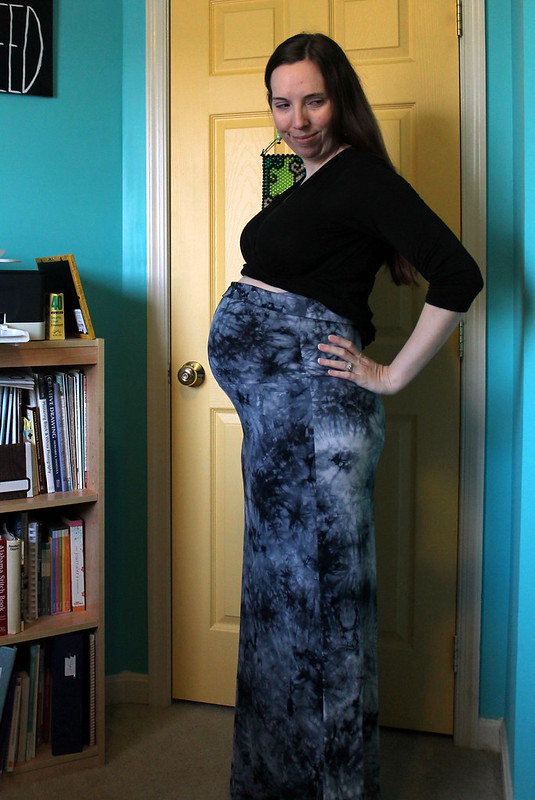
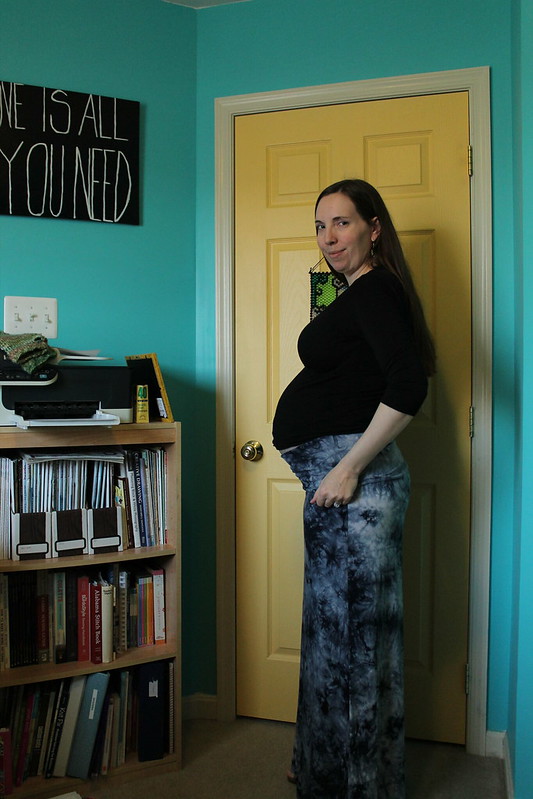
It’s been awhile since I’ve done a good old-fashioned pattern review, and this is the first thing I’ve made for myself in awhile that didn’t involve some kind of DIY maternity hacking. So here goes! For the record, this is me modeling at 29 weeks, according to my phone app. (Just shy of 11 weeks left–whaaaaaat? Also, I’m still having trouble wrapping my head around the whole week-to-month conversion. But hey, I’m in the third trimester now! Which is why I look tired in every single picture, I guess. I tried.)

Simplicity 1469 side viewPattern: Simplicity 1469

Description: From the website: “Stay comfortable and stylish during your pregnancy in this flattering maternity top and dress. These items are just what you need for discreet nursing once your baby arrives, just pull down v neck to reveal opening.”

Pattern sizing: XS-XL. I made a medium, since that was my pre-pregnancy size.

Did it look like the photo/drawing on the pattern envelope once you were done sewing it? Pretty much, yeah. Maybe a little looser in the sleeve area than it looked on the model.

Were the instructions easy to follow? I thought so. Though I somehow completely missed that I was supposed to cut the midriff pieces twice, and didn’t realize that until I was halfway through constructing the back. More on that later.

Simplicity 1469 on dummyWhat did you particularly like or dislike about the pattern? 
Like: The styling. Since it involves pleats instead of gathers, it’s a sleeker look than a lot of maternity tops tend to be. And hanging on Donna, it actually looks like it could pass for a drapier non-maternity top. Never mind that I fill up the bodice way better than she does right now.

Dislike: Since this originated as an independent pattern, though it’s now officially licensed to Simplicity, I was surprised at how big the sizing ended up. Especially up top! I think that it may just be a case of being too big in the back for me, because I tried pinching it in a few inches and it seemed to reduce the front gapping quite a bit. Though I’m not going to do anything to take it in just yet, since this means there should be plenty of room to accommodate whatever happens to my general torso region over the next 2 1/2 months! (I may go back and add a back seam later to reduce the amount of fabric, if it really bugs me.)

Simplicity 1469 nursing detail
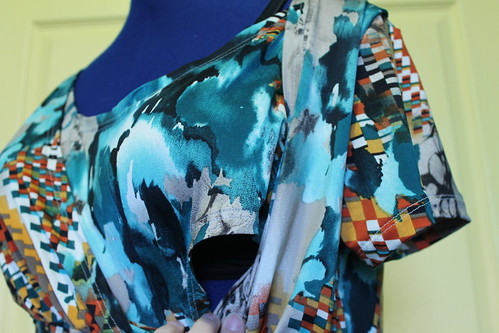
I will also admit that I’m concerned about the functionality as a nursing top. They weren’t kidding when they said “discreet”. Obviously I’m not going to model this part on myself, and Donna’s sizing is nowhere close to mine currently. So the openings don’t sit as low on me as they do on here, but look how small they are! I don’t want to deconstruct the entire front, since serging the 5/8″ seam allowance means I undoubtedly lost the little snips I made to mark the pleats. But I am seriously considering going back and cutting those side openings a little bigger, even if I have to hand-stitch the edges. I’ll have to see how it works once I’m actually attempting to use it for that.

Fabric used: An ITY jersey that my mom gave me for Christmas. For stashbusting tracking purposes, this used all but an approximately 11″ long cut of 2 yards. I should probably just throw out those 11″, but it’s so hard to let go of prints I like!

Pattern alterations or any design changes you made: Back to that midriff bit–since I failed to notice how many times I was supposed to cut those pieces out and was just skimming ahead on the directions when I started this, I decided to construct the fronts and backs flat to facilitate seam matching. I’m honestly not sorry that I did that, because another layer of jersey plus serged seams would have just made it bulky around the empire waist, and I really don’t need purposely added bulk in my clothes right now! Plus, I really do think that made it easier to get the seamlines to line up. Even though it involved multiple rounds of basting and unpicking to do so.

Would you sew it again? Would you recommend it to others? Let’s put it this way: I don’t think I’d sew it in this particular type of knit again. I’m not happy with the underlay neckline gaping–the polyester wasn’t pressing that great, and I had to resort to wonder tape to stick it down long enough to stitch it. So I think that contributed a lot. Of course, my iron is currently either possessed or in the throes of death, and my sewing machine and serger both also weren’t very happy to work with this fabric–I was fighting skipped stitches and serger tension issues the entire time, despite jersey needles and walking feet and such. All of this combined resulted in the edge finishings and hems looking a little more homemade-in-the-bad-way than I would prefer. Sigh.

All of this to say, I would like to attempt this pattern again, but in a more natural fiber that might have better stretch and recovery/get along better with my machines. I actually do have some of the patterned knit and a lot more of the solid teal left over from my Plantain top, and I think it would work great as a sleeveless version. But if I do make this again, I think I’m going to make the nursing openings much bigger! And maybe add some elastic in the crossover V-section to help it bounce back better. And probably take some of that width out of the back pieces.

We’ll see if I get to it, since the window of opportunity on maternity sewing still having a point is coming to a close. Also, I have plans to make another nursing-friendly maxi-dress that will be taking priority over this pattern. I need something fun to wear to my baby shower, after all! And aside from that, my sewing plans for April are mainly centering around the Small Human Beings Sewalong that Cindy and two other new-to-me bloggers are hosting. Not that everything I’ve been sewing for months wouldn’t qualify anyway, but the timing couldn’t be more perfect for me, since it’s early enough in this last trimester that I’m not dead exhausted (even if I look it), and I don’t actually have to compete with said small human being for sewing time yet. More on those plans to come.

it’s the time of the season

Happy spring, right? Here in the good old Mid-Atlantic, ours started with winter trying to get in one last sucker punch! I think it’s time for a breakup with cold weather, because I am OVER winter clothes. I know I say that every single year, but with my currently limited wardrobe choices, it’s even worse. I’ve been wearing the same 2 pairs of pants (with the jeans mixed in as I can) and the same 3 cardigans almost every single day. And my one purchased winter maternity top is looking rather dingy and sad. I guess that’s what I get for buying a cream sweatery-looking top.

That being said, with the limited window I have remaining in which making clothes for myself to wear throughout the rest of this pregnancy still has a point, I’m trying to focus on things that will carry me through the spring and into the summer. And, hopefully, still be wearable afterwards.

Tie dye maternity skirt frontEnter my new maxi-skirt! The fabric is a luscious-feeling bamboo-rayon jersey blend, part of the mini-stash of knits that my parents gave me for Christmas. It took me a lot of thinking initially about whether this fabric wanted to be a skirt or a top, but once I realized that I only have 2 pairs of non-jeans maternity pants left that still fit (I’ve outgrown the third, which were a little small on me when I first chopped them into maternity pants), and they’re both reconstructed corduroy pants, a warmer-weather friendly piece of bottomwear won out.

This month’s Stashbusting Sewalong theme is sewing with patterns that you already have. So I based this skirt rather loosely on Simplicity 7229, which I’ve used a few times before for skirts and capri pants. (I’m having to link this to my Pinterest since it’s out of print, so hopefully it’ll work!) The original skirt is pretty basic– the two pieces for the front and back are the same, and it has a wide yoke with a drawstring top. I’d always made it in wovens before, but here’s the changes (aside from knit fabric) that I made to make it more maternity-friendly:

    skirt full panel

  • Added several inches to the length of the front/back pieces. Which I actually did the last time I made this pattern, because the original pattern was this awkward mid-calf length, and I ended up hating that and chopping off the previously made skirts to a shorter length.
  • I did also have to narrow that at the bottom a bit, because my fabric wasn’t quite wide enough to accommodate the extra width. But since it’s stretchy, that’s ok. Especially since I’m starting to get into the waddle phase and my steps aren’t quite as big as they used to be.
  • While I used the yoke/drawstring waistband pieces to get a general idea of how wide to cut it, I replaced that with a slightly skinnier but much longer rectangular piece. The idea is that I can use it to cover up the baby bump for now–the over-bump stuff sits on me way better than under-bump stuff, which just feels awkward and like it’s constantly on the verge of falling down. It’s a little loose at the very top of the band, around the rib area. But I’m not too worried about it.

skirt yoga waistband

    It folds down into a yoga-style waistband, so I’m hoping that it’ll be snug enough that I can wear this skirt once I’m a little smaller around the waist again, too! It’s obviously hard to tell how that will work right now, but a girl can dream, right? 

    Overall, I’m really pleased with how this adaptation worked out, and how fast it was to sew together! I did all of it, including cutting out, in 2 sewing sessions. Which is pretty speedy for me. Depending on how this works out to wear afterwards, this just may be how this skirt pattern ends up getting used from now on. It’s so tempting to find more of this type of knit and whip out a few more! But I have several pieces of knit that I still want to make other clothes out of to wear in the meantime, so I shall try to restrain myself.

    I used up pretty close to a full 2 yards on this. As an added bonus, I had just enough fabric left to make a little something for the Hobbit! We’re actually doing pretty well with collecting baby clothes so far, largely thanks to my mother-in-law, who’s brought over multiple bags of things that neighbors and acquaintances were getting rid of.  At least, we’re doing pretty well with onesies and pajamas. What seems to be largely lacking is pants. Given his nickname, all I can think of is that old Lord of the Rings movie meme where certain words get substituted with “pants”. The most famous being…

    Which never fails to crack me up, but Hobbit is going to need some pants eventually. So I made some.

    tie dye leggingsThe pattern was a freebie that I found on Craftsy, the Go To Baby Leggings. I wasn’t entirely sure about tie-dyed pants for a boy, but a few kind sewcialists on Instagram talked me into it, and I hope these actually end up fitting him because I think they turned out pretty cute! I made these in the 3-6 month size–partially because lightweight jersey pants going into the fall make sense, and partly because I literally did not have enough fabric left to make them any bigger. Doug was pretty impressed, I think–I cut and sewed these in their entirety on Thursday, along with finishing the skirt, and his instant reaction was that they were adorable and I should post them on Facebook. Always a good sign. I wish I knew how they were actually going to fit him, because I had these cut out and sewn together entirely in basically no time! But at least I have the pattern tested, so if it works out, I can always fall back on this as a quick project while he naps or something.

    mama’s got a brand new bag

    Diaper bag
    I’ll admit, this wasn’t the most fun sewing project for me. It started and ended with some issues that really put a damper on my enthusiasm. But I just couldn’t bring myself to buy or register for a diaper bag when I knew I had the perfect fabric for one at home already! I’ve had this leaf-print suedecloth in my stash for a few years now. It was one of the pieces that I got as a Christmas present from my mom parents, and while I like the graphics, the colors in the fabric really didn’t go with much of anything in my wardrobe. So I was completely stumped about what to do with it until this pregnancy happened. I guess it was just waiting to be a bag all along! So I’ve been plotting this one for a couple of months, even before I knew Hobbit is a boy, because the colors made me think it’s gender-neutral enough to work either way.

    side pocket
    The pattern is the Professional Tote by The Creative Thimble. I’d asked my mom, who makes bags on a much more regular basis than I do, if she had any suggestions, and this was the one she came up with. I like that it’s loaded with pockets! There’s the zippered one plus a slide-in one shown on the first picture, a big magnetically snapped one on the opposite side, and two elastic ones on either smaller side that will be great for holding bottles and such.

    lining
    Inside, there’s also a velcroed pleated pocket with a slide-in pocket on each side (the flap with the outside fabric covers the velcro one), a zippered divider pocket, and a big one that covers almost an  entire side of the lining. This lining part was where I really got stumped on the directions–the patch/pleated pockets were fine, I had no trouble figuring out the bottom of the bag, but I think I did something seriously wrong with the zipper pocket. Based on the measurements the pattern gave later, it looks like it was supposed to be something like 5″ taller! But I could not make any sense of that particular part, went with what actually worked, and ended up with a divider that’s maybe 4″ tall, tops. By this point of the bag, I’d already spent something like an hour on this one pocket, and I was really starting to get antsy to finish so I can make some clothes again, so I didn’t bother redoing it.

    (Seriously–I’m kind of worried about the clothes. My belly has outgrown the first refashioned pair of pants to the point where it hurts to wear them, my other two pairs of refashioned pants are corduroy, and I only have one skirt that’s appropriate to wear for teaching–the other is denim and too short for me to comfortably wear without leggings underneath. So I’m literally running out of things to wear for work! But it’s hard to justify shopping, or even too much sewing, when I only have a little over one trimester to go.)

    Aside from that pocket, as I said, I did have some issues. Though they weren’t all the bag’s fault. The first day I started sewing on this, my machine was having some weird issue where the stitches weren’t staying in the fabric to just one side of the zipper foot–and of course that outside zipper pocket was the first thing to be sewn! Thankfully, that resolved itself after I turned the machine off and started again another day, and Bernadette has been working fine ever since. I also had a lot of trouble keeping track of what fabric was supposed to be for what piece, ended up having to re-cut a couple of things in the solid brown, and have some random rectangles left over as a result. I’m blaming pregnancy brain for that one. Getting the interfacing to stay stuck to the suedecloth in particular was also a pain, as was actually navigating sewing several stiff layers of fabric that just did not want to go around my machine. I suspect that probably would have worked better if I’d used all quilt cotton, since the suedecloth is a little thicker/more slippery than that. I finished up last night with the top zippered part, and ended up having to rip out and redo so much of it–I started by having the zipper pull face the lining instead by accident, and then the zipper somehow got twisted, so I had to rip out and redo the other side as well! But it’s done, and I’m happy with the results overall, so I can move on without much disappointment.

    Stashbusting totals: I used about 2 1/4 yards of fabric from my own stash (1 1/2 of the suedecloth, and about 3/4 yard of the solid brown–which I either forgot to put in my stash list or I wrote down the wrong yardage initially, because it was listed as 1/2 yard to begin with!), plus my mom donated the quilt cotton from her stash for the lining, because it went so well. She also let me use her heavy-duty bag interfacing. I did have to buy the webbing for the straps and the two light tan zippers, but I was able to pull the third zipper (a dark brown, on the inside) from my stash as well. 

    I do have about half a yard of the suedecloth left, as well as some plain PUL that I had to buy last-minute to reinforce the closure sections of some of the diapers that I’m still working on. So I’m going to use the bulk of it up to make some kind of roll-up or fold-up changing mat that I can keep in the bag, since the suedecloth is nice and washable. But I think I can afford to take the time to make something a little more wearable first, right?